Ir para o conteúdo principal

Canon Vixia HF R500 Microphone Replacement

O que você precisa

  1. Canon Vixia HF R500 Microphone Replacement, Grip Belt: passo 1, imagem 1 %32 Canon Vixia HF R500 Microphone Replacement, Grip Belt: passo 1, imagem 2 %32 Canon Vixia HF R500 Microphone Replacement, Grip Belt: passo 1, imagem 3 %32
    • On the right side of the camcorder remove the grip belt.

  2. Canon Vixia HF R500 Microphone Replacement, Battery: passo 2, imagem 1 %32
    • Hold on to the battery.

  3. Canon Vixia HF R500 Microphone Replacement: passo 3, imagem 1 %32
    • On the bottom of the battery hold the battery release switch.

  4. Canon Vixia HF R500 Microphone Replacement: passo 4, imagem 1 %32
    • Remove the battery slowly away from the camcorder.

    • Removing the battery quick or in a different angle may cause sparks and damage to device.

  5. Canon Vixia HF R500 Microphone Replacement, Canon Vixia HF R500 Disassembly: passo 5, imagem 1 %32 Canon Vixia HF R500 Microphone Replacement, Canon Vixia HF R500 Disassembly: passo 5, imagem 2 %32
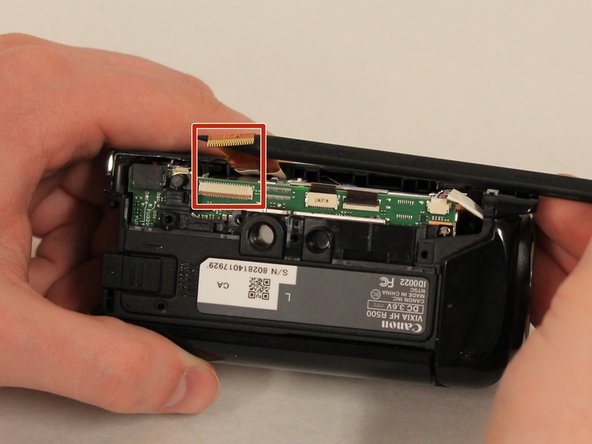
    • Remove the two 8mm Philips #000 screws on the side where the grip belt was located on.

  6. Canon Vixia HF R500 Microphone Replacement: passo 6, imagem 1 %32
    • Remove the two 4mm Philips #000 head screws from the bottom of the camcorder.

    • A hidden 4mm Philips #000 screw is shown under the black plug shown.

  7. Canon Vixia HF R500 Microphone Replacement: passo 7, imagem 1 %32
    • Remove the side piece plate.

  8. Canon Vixia HF R500 Microphone Replacement: passo 8, imagem 1 %32
    • Near the LCD screen, remove the three 7mm Philips #000 screws in the picture shown.

  9. Canon Vixia HF R500 Microphone Replacement: passo 9, imagem 1 %32
    • Carefully place the camcorder where the inside of the device is facing upwards and remove the 3mm Philips #000 screw shown.

    • Do not use strong magnetic parts on the inside, as they may damage the device.

  10. Canon Vixia HF R500 Microphone Replacement: passo 10, imagem 1 %32
    • Using the spudger, pull the tab shown to start removing the ribbon cable.

  11. Canon Vixia HF R500 Microphone Replacement: passo 11, imagem 1 %32 Canon Vixia HF R500 Microphone Replacement: passo 11, imagem 2 %32 Canon Vixia HF R500 Microphone Replacement: passo 11, imagem 3 %32
    • Using the Spudger, carefully remove the two ribbon cables that are connected to the top of the device.

  12. Canon Vixia HF R500 Microphone Replacement: passo 12, imagem 1 %32
    • Remove the top piece.

  13. Canon Vixia HF R500 Microphone Replacement, Lens Cover: passo 13, imagem 1 %32
    • Remove the two 5mm Phillips #000 screws near the LCD screen.

  14. Canon Vixia HF R500 Microphone Replacement: passo 14, imagem 1 %32
    • Remove the single 5mm Phillips #000 screw located on the top of the camera near the lens cover.

  15. Canon Vixia HF R500 Microphone Replacement: passo 15, imagem 1 %32
    • Unplug the cord connecting the camera to the lens cover. Grip the white plug near the port and pull it out.

    • Do not pull the cord by the wires. Grip the white plastic plug.

  16. Canon Vixia HF R500 Microphone Replacement: passo 16, imagem 1 %32
    • The lens cover is detached from the camera and can now be removed.

    • Repair or replace damaged components in the lens cover.

    • Ensure lens cover mechanism is free of debris.

  17. Canon Vixia HF R500 Microphone Replacement, Microphone: passo 17, imagem 1 %32
    • Remove one 5mm Philips #000 screw from the lens cap.

  18. Canon Vixia HF R500 Microphone Replacement: passo 18, imagem 1 %32
    • Remove the lens cover and place in a safe place.

  19. Canon Vixia HF R500 Microphone Replacement: passo 19, imagem 1 %32
    • Remove the one 3mm Philips #000 screw that holds the microphone in place.

  20. Canon Vixia HF R500 Microphone Replacement: passo 20, imagem 1 %32
    • Remove the metal plate that holds the microphone.

  21. Canon Vixia HF R500 Microphone Replacement: passo 21, imagem 1 %32
    • Remove the defective microphone out of the lens cap.

  22. Canon Vixia HF R500 Microphone Replacement: passo 22, imagem 1 %32
    • Insert the new microphone in the same place.

Conclusão

To reassemble your device, follow these instructions in reverse order.

Uma outra pessoa concluiu este guia.

0 comentários

Adicione um comentário

Exibir estatísticas:

Últimas 24 horas: 0

Últimos 7 dias: 0

Últimos 30 dias: 4

Duração total: 169