Esta versão pode conter edições incorretas. Mude para o último instantâneo verificado.
O que você precisa
-
Este passo não foi traduzido. Ajude a traduzi-lo
-
Remove the four 2mm Phillips #00 screws on both sides of the camera.
-
-
Este passo não foi traduzido. Ajude a traduzi-lo
-
Remove the single 4mm Phillips #00 screw from the bottom.
-
-
Este passo não foi traduzido. Ajude a traduzi-lo
-
Remove the 3mm Phillips #000 screw from the top of the camera.
-
-
-
Este passo não foi traduzido. Ajude a traduzi-lo
-
Pry the golden ribbon cable from the motherboard with a plastic opening tool.
-
-
Este passo não foi traduzido. Ajude a traduzi-lo
-
Remove the 3mm Phillips #000 screw from the motherboard.
-
-
Este passo não foi traduzido. Ajude a traduzi-lo
-
Use a plastic opening tool to flip up the retaining flap on the ribbon cable ZIF socket.
-
-
Este passo não foi traduzido. Ajude a traduzi-lo
-
Unplug the small chip from the face of the camera using a pair of tweezers.
-
-
Este passo não foi traduzido. Ajude a traduzi-lo
-
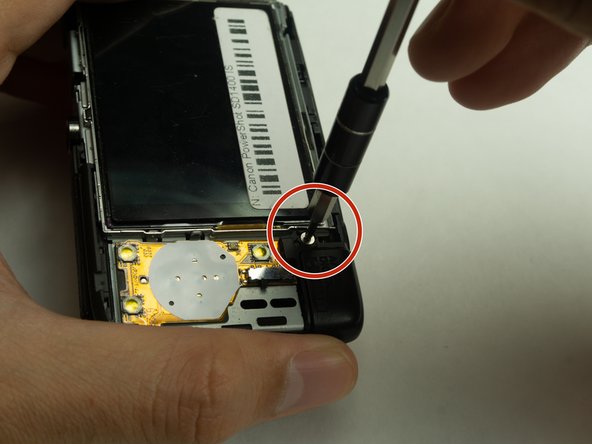
Remove the 3mm Phillips #000 screw from the rear face of the camera.
-
-
Este passo não foi traduzido. Ajude a traduzi-lo
-
Pry the golden ribbon cable attached to the USB port using a plastic opening tool.
-
-
Este passo não foi traduzido. Ajude a traduzi-lo
-
Remove the 3mm Phillips #000 screw located at the top right of the USB port.
-


Cancelar: não concluí este guia.
Uma outra pessoa concluiu este guia.
Equipe

IUPUI, Team S1-G2, Harley Spring 2018 Membro de IUPUI, Team S1-G2, Harley Spring 2018
IUPUI-HARLEY-S18S1G2
Membros da 7
Autoria de 4 guias