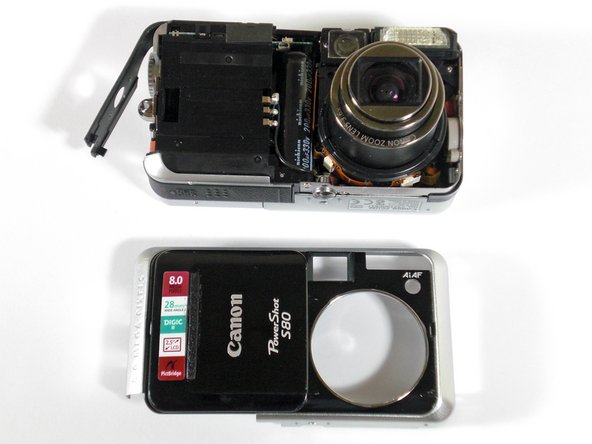
Ir para o conteúdo principal

Canon PowerShot S80 Motherboard Replacement

O que você precisa

  1. Canon PowerShot S80 Motherboard Replacement, Outer Casing: passo 1, imagem 1 %32 Canon PowerShot S80 Motherboard Replacement, Outer Casing: passo 1, imagem 2 %32
    • Remove the knot on the wrist lanyard.

    • Remove the battery and the memory card.

  2. Canon PowerShot S80 Motherboard Replacement: passo 2, imagem 1 %32 Canon PowerShot S80 Motherboard Replacement: passo 2, imagem 2 %32
    • Begin removing the screws on the bottom of the outer casing.

    • Next, remove the rest of the screws from the outer casing.

  3. Canon PowerShot S80 Motherboard Replacement: passo 3, imagem 1 %32 Canon PowerShot S80 Motherboard Replacement: passo 3, imagem 2 %32 Canon PowerShot S80 Motherboard Replacement: passo 3, imagem 3 %32
    • Gently pull the front cover off of the camera.

  4. Canon PowerShot S80 Motherboard Replacement: passo 4, imagem 1 %32 Canon PowerShot S80 Motherboard Replacement: passo 4, imagem 2 %32 Canon PowerShot S80 Motherboard Replacement: passo 4, imagem 3 %32
    • Open the "A/V Out Digital" cover. Remove the screw inside.

    • Gently pull off the back casing.

    • Remove the black "L" shaped piece of metal.

  5. Canon PowerShot S80 Motherboard Replacement, LCD Screen: passo 5, imagem 1 %32
    • Remove the three screws that are holding the screen in place. Free the screen from the underlying components.

    • Be careful with the ribbon wire that is still attached on the left side of the screen.

  6. Canon PowerShot S80 Motherboard Replacement: passo 6, imagem 1 %32 Canon PowerShot S80 Motherboard Replacement: passo 6, imagem 2 %32
    • With the spudger, gently lift the black flap that is holding the wide ribbon cable wire in place.

    • Unplug the wide ribbon cable.

    • Unplug the narrow ribbon cable to free the LCD screen from the camera body.

  7. Canon PowerShot S80 Motherboard Replacement, Motherboard: passo 7, imagem 1 %32
    • Remove the screws holding down the function set button.

  8. Canon PowerShot S80 Motherboard Replacement: passo 8, imagem 1 %32
    • Gently pry up the tab with a metal spudger and remove the ribbon cable.

  9. Canon PowerShot S80 Motherboard Replacement: passo 9, imagem 1 %32
    • Be mindful of the pins as you lift up and remove the function/set button.

  10. Canon PowerShot S80 Motherboard Replacement: passo 10, imagem 1 %32 Canon PowerShot S80 Motherboard Replacement: passo 10, imagem 2 %32 Canon PowerShot S80 Motherboard Replacement: passo 10, imagem 3 %32
    • Remove the screws from the metal plate.

    • Gently remove the metal plate.

  11. Canon PowerShot S80 Motherboard Replacement: passo 11, imagem 1 %32 Canon PowerShot S80 Motherboard Replacement: passo 11, imagem 2 %32
    • Lift the tab connecting the ribbon cable and detach.

  12. Canon PowerShot S80 Motherboard Replacement: passo 12, imagem 1 %32 Canon PowerShot S80 Motherboard Replacement: passo 12, imagem 2 %32
    • Use a spudger to lift up the ribbon cable tab.

    • Detach the ribbon cable.

  13. Canon PowerShot S80 Motherboard Replacement: passo 13, imagem 1 %32 Canon PowerShot S80 Motherboard Replacement: passo 13, imagem 2 %32
    • Gently remove the entire ribbon cable connection to release the ribbon cable from the camera.

  14. Canon PowerShot S80 Motherboard Replacement: passo 14, imagem 1 %32
    • Unscrew the circuit board from the flash unit.

  15. Canon PowerShot S80 Motherboard Replacement: passo 15, imagem 1 %32 Canon PowerShot S80 Motherboard Replacement: passo 15, imagem 2 %32 Canon PowerShot S80 Motherboard Replacement: passo 15, imagem 3 %32
    • Pry up the ribbon cable connection and remove it from the camera.

    • Lift the ribbon cable tab and completely detach the cable from the camera.

  16. Canon PowerShot S80 Motherboard Replacement: passo 16, imagem 1 %32
    • Pry up the connection, being mindful of the light adhesive.

  17. Canon PowerShot S80 Motherboard Replacement: passo 17, imagem 1 %32
    • Remove the last screw holding the motherboard to the main body.

  18. Canon PowerShot S80 Motherboard Replacement: passo 18, imagem 1 %32 Canon PowerShot S80 Motherboard Replacement: passo 18, imagem 2 %32
    • Use a spudger to gently lift the motherboard from the camera.

Conclusão

To reassemble your device, follow these instructions in reverse order.

2 outras pessoas executaram este guia.

BrettH

Membro desde: 10/28/09

219 Reputação

Autoria de 5 guias

Equipe

Cal Poly, Team 19-5, Maness SU 2012 Membro de Cal Poly, Team 19-5, Maness SU 2012

CPSU-MANESS-SU12S19G5

1 Membro

Autoria de 5 guias

0 comentários

Adicione um comentário

Exibir estatísticas:

Últimas 24 horas: 0

Últimos 7 dias: 0

Últimos 30 dias: 3

Duração total: 4,417