Ir para o conteúdo principal

Canon PowerShot A540 Front Cover Replacement

O que você precisa

  1. Canon PowerShot A540 Front Cover Replacement, Back Cover: passo 1, imagem 1 %32 Canon PowerShot A540 Front Cover Replacement, Back Cover: passo 1, imagem 2 %32
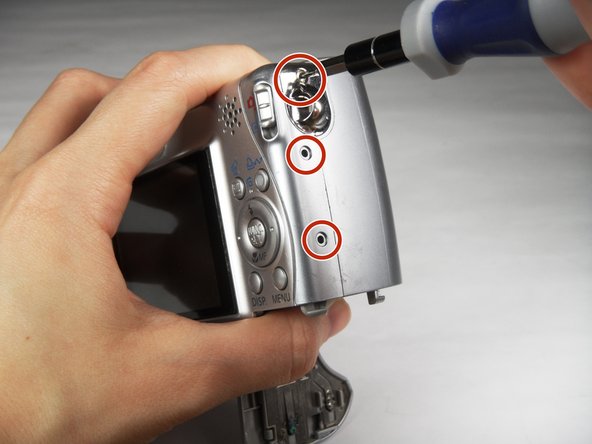
    • Turn off the camera.

    • Turn the camera upside-down and press the tab to release the battery cover. Remove the batteries.

  2. Canon PowerShot A540 Front Cover Replacement: passo 2, imagem 1 %32
    • Turn the camera upside down to view the "Card/Batt. Open" Cover.

    • Use a Phillips head #000 screwdriver to remove the three (3) 4.0 mm screws.

  3. Canon PowerShot A540 Front Cover Replacement: passo 3, imagem 1 %32
    • Open "Card/Batt. Open" Cover.

    • Remove the one (1) 5.0 mm screw with the Phillips head #000 screwdriver.

  4. Canon PowerShot A540 Front Cover Replacement: passo 4, imagem 1 %32
    • Turn the camera to the right side of the LCD screen.

    • Remove the three (3) 4.0 mm screws with the Phillips head #000 screwdriver.

  5. Canon PowerShot A540 Front Cover Replacement: passo 5, imagem 1 %32 Canon PowerShot A540 Front Cover Replacement: passo 5, imagem 2 %32 Canon PowerShot A540 Front Cover Replacement: passo 5, imagem 3 %32
    • Gently remove the back cover.

    • Start at the bottom at the corner of the "Card/Batt. Open" Cover.

    • Then move onto the other edges and the top.

    • It may be tight at the top!

  6. Canon PowerShot A540 Front Cover Replacement, Front Cover: passo 6, imagem 1 %32 Canon PowerShot A540 Front Cover Replacement, Front Cover: passo 6, imagem 2 %32
    • Turn the camera to view the front.

    • Remove the lens guard.

    • Press the lens guard's button as you turn the guard counterclockwise.

  7. Canon PowerShot A540 Front Cover Replacement: passo 7, imagem 1 %32
    • Turn the camera to the side left of the LCD screen.

    • Remove the one (1) 4.0 mm screw with the Phillips head #000 screwdriver.

  8. Canon PowerShot A540 Front Cover Replacement: passo 8, imagem 1 %32
    • Remove the front cover gently.

    • When removing the front cover, a thin, black rubber washer may fall off the lens. If it does, make sure to put it back on the lens before reassembly.

Conclusão

To reassemble your device, follow these instructions in reverse order.

2 outras pessoas executaram este guia.

Carley Fuller

Membro desde: 03/23/15

434 Reputação

Autoria de 3 guias

Equipe

Baylor, Team 7-12, Williams Spring 2015 Membro de Baylor, Team 7-12, Williams Spring 2015

BU-WILLIAMS-S15S7G12

Membros da 3

Autoria de 20 guias

0 comentários

Adicione um comentário

Exibir estatísticas:

Últimas 24 horas: 1

Últimos 7 dias: 5

Últimos 30 dias: 27

Duração total: 1,440