Ir para o conteúdo principal

Canon PowerShot A200 LCD Display Replacement

O que você precisa

  1. Canon PowerShot A200 LCD Display Replacement, Disassembling the Canon PowerShot A200 Case: passo 1, imagem 1 %32
    • Use a Phillips #00 screwdriver to remove the two screws at the bottom of the camera.

  2. Canon PowerShot A200 LCD Display Replacement: passo 2, imagem 1 %32 Canon PowerShot A200 LCD Display Replacement: passo 2, imagem 2 %32
    • Locate a screw and a rubber covering on the left side of the camera. Slide the rubber covering to expose a second screw.

    • Remove both screws with the Phillips #00 screwdriver.

  3. Canon PowerShot A200 LCD Display Replacement: passo 3, imagem 1 %32 Canon PowerShot A200 LCD Display Replacement: passo 3, imagem 2 %32
    • Open the battery compartment on the right side of the camera by pushing slightly in the direction of the arrow.

    • Be sure to remove the memory card.

    • Remove the two screws by the memory card slot using the Phillips #00 screwdriver.

  4. Canon PowerShot A200 LCD Display Replacement: passo 4, imagem 1 %32 Canon PowerShot A200 LCD Display Replacement: passo 4, imagem 2 %32
    • Pull the grey tab towards the back of the camera. Lift the black cover to expose the battery slots.

    • Remove the two visible screws with the Phillips #00 screwdriver.

    • During reassembly, the holes for these screws must align properly with the interior of the camera body. Then the black battery cover must lie flat and be held in place by the grey tab.

  5. Canon PowerShot A200 LCD Display Replacement: passo 5, imagem 1 %32 Canon PowerShot A200 LCD Display Replacement: passo 5, imagem 2 %32
    • Remove the screen battery located to the left of the screen.

  6. Canon PowerShot A200 LCD Display Replacement: passo 6, imagem 1 %32 Canon PowerShot A200 LCD Display Replacement: passo 6, imagem 2 %32
    • Gently pull the camera apart from the top.

    • Be careful. The two halves are still attached by two short ribbons at the bottom of the camera.

  7. Canon PowerShot A200 LCD Display Replacement: passo 7, imagem 1 %32 Canon PowerShot A200 LCD Display Replacement: passo 7, imagem 2 %32
    • Locate the black tabs on either side of the white ribbon.

    • Use the metal tweezers to gently move these tabs to the outside edges of the ribbon.

    • Gently pull the white ribbon out from its connection.

  8. Canon PowerShot A200 LCD Display Replacement: passo 8, imagem 1 %32 Canon PowerShot A200 LCD Display Replacement: passo 8, imagem 2 %32 Canon PowerShot A200 LCD Display Replacement: passo 8, imagem 3 %32
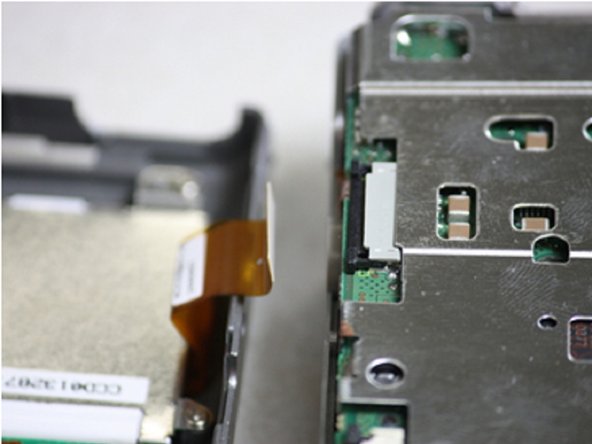
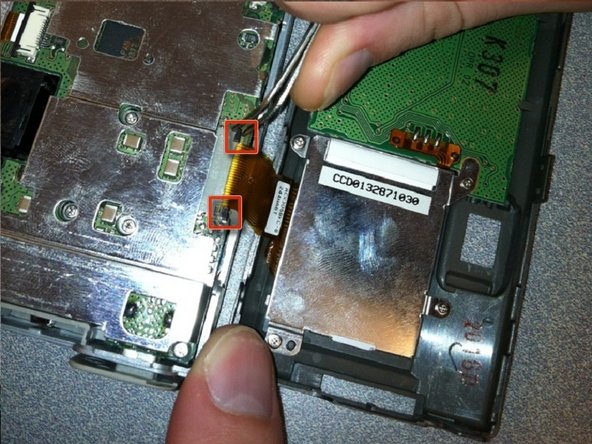
    • Locate the black tabs on either side of the orange ribbon.

    • Use the metal tweezers to gently move these tabs to the outside edges of the ribbon.

    • Gently pull the orange ribbon out of its connection.

    • Your camera will now be in two separate pieces.

  9. Canon PowerShot A200 LCD Display Replacement, LCD Display: passo 9, imagem 1 %32
    • Remove the camera case. Refer to the prerequisite guide Disassembling the Canon PowerShot A200 Case as needed.

    • Locate the LCD Display. It is the thin, rectangular panel adjacent to the view finder.

    • Use the Phillips head screwdriver, rotating counter clockwise, to remove the four screws in each corner of the LCD Display. Set the screws aside.

  10. Canon PowerShot A200 LCD Display Replacement: passo 10, imagem 1 %32
    • Use the plastic opening tool, operating from the outside edge of the camera, to lift the LCD Display away from the back case.

    • The LCD Display will still be attached to the back of the camera case by an orange strip.

  11. Canon PowerShot A200 LCD Display Replacement: passo 11, imagem 1 %32
    • Use the soldering kit to desolder the LCD Display from the orange strip which is connected to the back of the camera.

    • Use the soldering kit to attach your new LCD Display in place of the old one.

    • When soldering, allow enough slack in the orange strip so the LCD Display will lie flat, and the white bar will lie parallel with the electronic components embedded in the green panel.

  12. Canon PowerShot A200 LCD Display Replacement: passo 12, imagem 1 %32
    • Locate the four set aside screws. Use the Phillips head screwdriver, rotating clockwise, to screw one into each corner of your new LCD Display onto the back camera case.

    • To help with proper alignment of the LCD Display, fasten the screws in the following order: top left, bottom right, bottom left, top right.

  13. Canon PowerShot A200 LCD Display Replacement: passo 13, imagem 1 %32 Canon PowerShot A200 LCD Display Replacement: passo 13, imagem 2 %32
    • Begin reassembling the camera with the orange strip with the yellow edge.

    • Align the orange strip on the back half of the camera with its slot on the front part of the camera.

    • Use the metal tweezers to insert the orange ribbon into the slot. Push the ribbon in as far as it can go into the slot.

    • Use the metal tweezers to push the black tabs at each side of the slot toward the center. The tabs will hold the orange ribbon in place.

  14. Canon PowerShot A200 LCD Display Replacement: passo 14, imagem 1 %32 Canon PowerShot A200 LCD Display Replacement: passo 14, imagem 2 %32
    • Align the white strip on the back half of the camera with its slot on the front part of the camera.

    • Use the metal tweezers to insert the white strip into the slot. Push the strip in as far as it can go into the slot.

    • Use the metal tweezers to push the black tabs at each side of the slot toward the center. The tabs will hold the white strip in place.

  15. Canon PowerShot A200 LCD Display Replacement: passo 15, imagem 1 %32 Canon PowerShot A200 LCD Display Replacement: passo 15, imagem 2 %32
    • Carefully slide both halves of the camera together, making sure all tabs are aligned. Press the sides firmly together until you hear a click.

  16. Canon PowerShot A200 LCD Display Replacement: passo 16, imagem 1 %32
    • Insert the screen battery back into its slot adjacent to the LCD Display.

    • The positive side of the battery should face away from the LDC Display screen.

  17. Canon PowerShot A200 LCD Display Replacement: passo 17, imagem 1 %32 Canon PowerShot A200 LCD Display Replacement: passo 17, imagem 2 %32 Canon PowerShot A200 LCD Display Replacement: passo 17, imagem 3 %32
    • Open the outer battery cover.

    • Use the Phillips head screwdriver, turning clockwise, to fasten two screws on each side of the battery case.

    • Flip the black battery cover down and press until it is secured by the gray tab.

    • Use the Phillips head screwdriver, turning clockwise, to fasten two screws on each side of the memory card slot.

    • Shut the outer battery cover.

  18. Canon PowerShot A200 LCD Display Replacement: passo 18, imagem 1 %32 Canon PowerShot A200 LCD Display Replacement: passo 18, imagem 2 %32
    • On the opposite side of the camera, use the Phillips head screwdriver, turning clockwise, to fasten two screws under the rubber cover.

    • Once both screws are in place, put the rubber cover back in place.

  19. Canon PowerShot A200 LCD Display Replacement: passo 19, imagem 1 %32
    • On the bottom of the camera, use the Phillips head screwdriver, turning clockwise, to fasten two screws on either side of the tripod opening.

    • The installation of your new LCD Display is complete.

Conclusão

Follow the instructions in the prerequisite guide Disassembling the Canon PowerShot A200 Case. Once completed, proceed with installing a new LCD Display.

Jeff Barich

Membro desde: 01/28/11

101 Reputação

Autoria de 1 guia

Equipe

Cal Poly, Team 7-37, Regan Winter 2011 Membro de Cal Poly, Team 7-37, Regan Winter 2011

CPSU-REGAN-W11S7G37

Membros da 4

Autoria de 10 guias

0 comentários

Adicione um comentário

Exibir estatísticas:

Últimas 24 horas: 0

Últimos 7 dias: 1

Últimos 30 dias: 5

Duração total: 930