Introdução
Seeing as there aren't any good guides online for the Canon 5D Mk III disassembly, I decided to make one that would allow me to get to the main PCB. I have fixed about a dozen of these in the past two years.
The 5D Mk III has been around since 2012, is a workhorse DSLR in the Canon lineup of cameras, and yet, no detailed guide exists. Hopefully, this one will help you to navigate well enough to delve into the rest of the camera parts as well.
O que você precisa
-
-
First things first, remove all the rubber hand grips from around the camera to have access to all external screws. Don't worry, these can be put back without any loss of stickiness.
-
Remove the plastic around the viewfinder by squeezing the sides and lifting towards the top of the camera.
-
-
-
Next, remove the silver screw.
-
Then the two black screws.
-
-
-
Turn the camera so the bottom is now on top and take out the three screws holding on the bottom of the back plate.
-
-
-
-
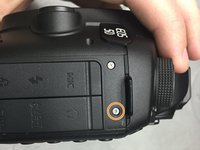
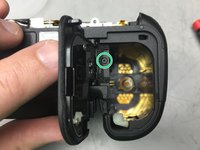
This screw needs to be removed next. This is what holds the left side of the entire back plate to the camera and if not removed will cause a major bend in the internal bracket.
-
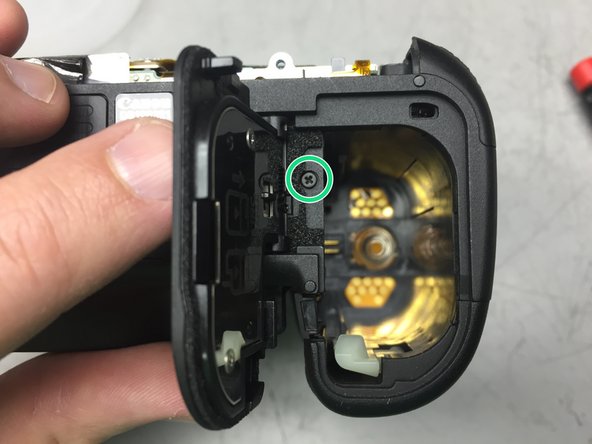
Remove this silver screw next but keep it separate from the previous one.
-
This screw holds in the battery. Must be removed before the next one.
-
Last screw holding in this side plate. Removing this entire side plate will allow the main pcb to be removed easier later on. You can leave the side plate intact for now and come back to these screws later if you'd like.
-
-
-
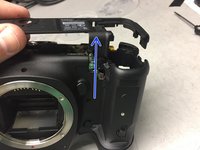
There is also a metal bracket that drives straight down into the body on the upper left. Be careful to lift straight up on the back plate until this is completely outside of the main body, then flip the whole back plate over to the left so you can reach the ribbon cable connector underneath.
-
This is a snap on connector that can be gently pried up with a small flat head screw driver or a thumbnail.
-
-
-
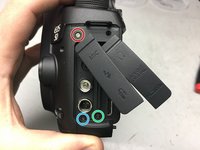
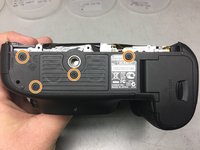
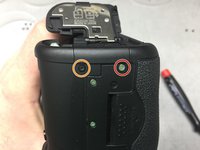
Remove these four screws from the bottom plate.
-
Remove this screw from underneath the battery door.
-
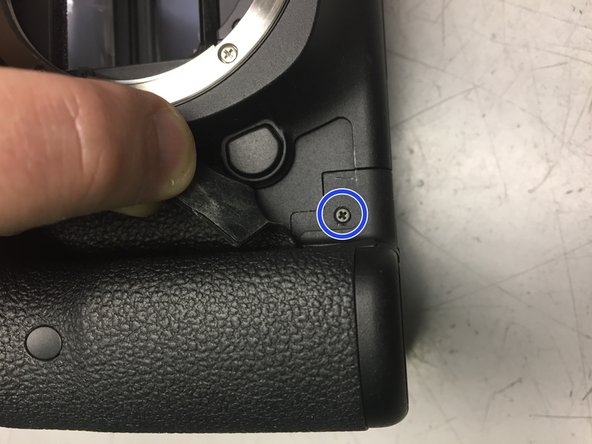
Remove this screw from the bottom front right. If you haven't removed the rubber grip material yet, now's the time to just take it off.
-
-
-
Remove this screw.
-
Finish by removing this silver screw.
-
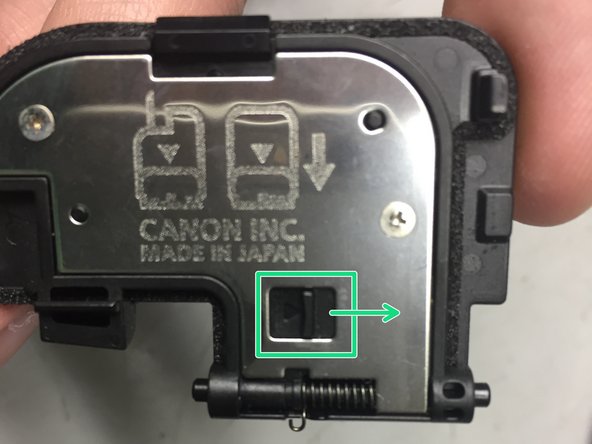
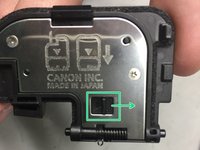
You can remove the battery door at any time if you feel it's in your way. It's not necessary, but it may help. There's a small raised black ridge that can be slid to one side to remove the battery door.
-
It's a tight fit, but wiggle the plate gently and pull straight up and out from the camera body to remove the bottom plate.
-
-
-
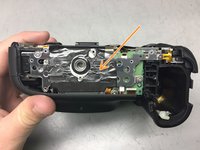
Gently pry this adhesive covering up until it is off of the main board at the back of the camera and drape it over the top of the camera. I always try to do this step without cutting or ripping the covering.
-
-
Ferramenta utilizada neste passo:Tweezers$4.99
-
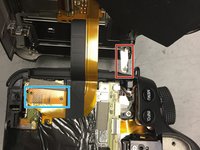
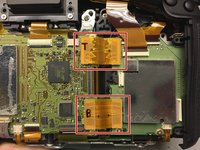
First, label the two ribbon connectors with top and bottom and be sure which side attaches to the main board and which side attaches to the secondary board on the right. This is important because these connectors only go on one way and can not be switched.
-
Next, remove each connector like you did earlier with your nail or a small flat screwdriver.
-
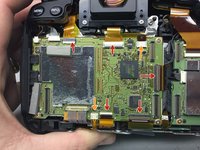
Using that same small flat screwdriver, you will need to remove these two connectors from underneath the main pcb. Pry gently from each end of the connectors until they come loose.
-
Using some tweezers or a very small set of needle nose pliers, gently remove these two connectors from the top left of the main pcb. Be careful not to pull on the wires, ONLY the white connector ends to pull them out.
-
-
-
These connectors have very small hinged flaps that must be lifted to let loose of the thin ribbon cables they're holding.
-
These ribbon cables may be gently pulled from the connectors with a small set of needle nose pliers. The one at the top of the board has a hole in the cable, so something very small like a tooth pick can fit in here to help pull the cable free.
-
This connector must be pried up with extreme caution. You absolutely can not pull on the wires leading into the connector as they are extremely delicate and will break easily. Using a small flat head screwdriver, pry up on either end very gently until the connector pops loose.
-
Underneath that connector is another that will need pried up. This one is another ribbon cable similar to the ones we've previously lifted with a small flat screwdriver.
-
Remove these three screws. They are all the same size.
-
Finally, remove this screw. It's a different size from the other three, so keep it separate.
-
-
-
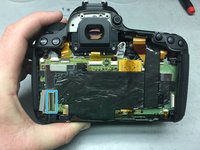
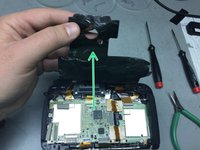
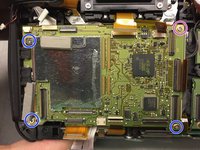
Now you can remove the main pcb from the camera body and replace if necessary.
-


To reassemble your device, follow these instructions in reverse order.
To reassemble your device, follow these instructions in reverse order.
Cancelar: não concluí este guia.
21 outras pessoas executaram este guia.
Documentos anexados

45 comentários
Hello, how do I purchase the main board...? Do you have a dealer I can buy from? Thanks alot
Hi mate I'm in Australia and I got mine from the USA on Ebay for $350AUD delivered
Thank you so much for this guide. Very helpful. I had an issue with my 5d m3 not powering up, was told by a repairer in a qoute that they tested the main PCB and it was faulty. I swapped the PCB for a new one myself which made no difference - camera was still a brick.
Investigating on the web I found that when this issue occured most people would report that the DC/DC PCB was replaced, so I swapped this PCB and the camera works perfectly.
To anyone having this 'no power' issue I would recommend changing the DC/DC PCB FIRST and then the main PCB if unsuccessful.
The costs for me were:
Main PCB $350 - Ebay
DC/DC PCB $80 - Ebay
Shipping to service center and quote $50
Quote for main PCB replacement $815 (I rejected the repairs and it myself)
I am confident that the main PCB was ok, but I'm not changing it back to find out!
Good luck and be careful with the scews! The heads strip very easily, use the proper screw driver, keep pressure on them and dont over tighten!
Thank you for this guide mate, it is very helpful. Also I have a request, Can you post how to remove Canon 5D Mark III's top cover? My 5D dropped and the top cover cracked also its LCD is broken. I have ordered a new replacement 5D top cover and I am looking to repair it by myself. Looking forward to get your help.
There is an attached file with the parts in exploded diagram view. I believe it's page 3 that will show you the screws necessary to remove. I have only needed to remove the top cover once before and it wasn't difficult. Keep in mind that the ribbon cables on the right may be attached to the top. I can't honestly remember. As with most cameras, remove the top cover slowly and keep a sharp eye for anything still connected.