Ir para o conteúdo principal

CR-10 X Linear Rail Replacement

O que você precisa

  1. CR-10 X Linear Rail Replacement, Hotend Removal down: passo 1, imagem 1 %32 CR-10 X Linear Rail Replacement, Hotend Removal down: passo 1, imagem 2 %32 CR-10 X Linear Rail Replacement, Hotend Removal down: passo 1, imagem 3 %32
    • Remove the Hotend cover screw

    • Remove the Hotend mounting screws

  2. CR-10 X Linear Rail Replacement, Belt removal and Stock X Carriage: passo 2, imagem 1 %32 CR-10 X Linear Rail Replacement, Belt removal and Stock X Carriage: passo 2, imagem 2 %32 CR-10 X Linear Rail Replacement, Belt removal and Stock X Carriage: passo 2, imagem 3 %32
    • Loosen Idler pulley bracket screws and remove the idler pulley bracket

    • Remove the belt

    • Remove the lower V-slot wheel bolt from X-carriage

  3. CR-10 X Linear Rail Replacement, Mounting screw Pattern & Sliding on the Rail: passo 3, imagem 1 %32 CR-10 X Linear Rail Replacement, Mounting screw Pattern & Sliding on the Rail: passo 3, imagem 2 %32 CR-10 X Linear Rail Replacement, Mounting screw Pattern & Sliding on the Rail: passo 3, imagem 3 %32
    • Follow the table for the recommended mounting locations

    • Take note to skip 2 holes between fasteners, and make sure to mirror this process from each of the end of the rail until you meet in the middle.

    • For rails with an odd number of mounting holes, the pattern will overlap in the middle

    • For rails with an even number of mounting holes, the pattern will be continued across the rail

    • Pre-install all the M3x8 SHCS screw and Sliding T-nuts

    • Install the Printed T-nut guide on the end of the X axis extrusion, and slide the rail on to the X-axis from Right to left

    • The guide helps to slide the T-nuts into the extrusion

  4. CR-10 X Linear Rail Replacement, Mounting the Rail: passo 4, imagem 1 %32 CR-10 X Linear Rail Replacement, Mounting the Rail: passo 4, imagem 2 %32 CR-10 X Linear Rail Replacement, Mounting the Rail: passo 4, imagem 3 %32
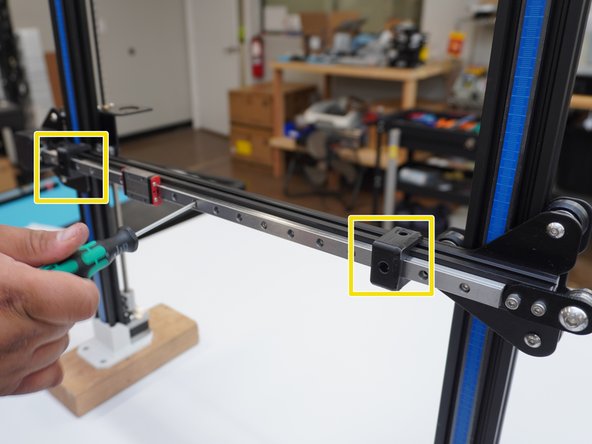
    • Slide the rail until you have about 2-3 mm between the rail and the end of the X axis extrusion.

    • Use both Linear rail Guide to center the rail to the Aluminum extrusion

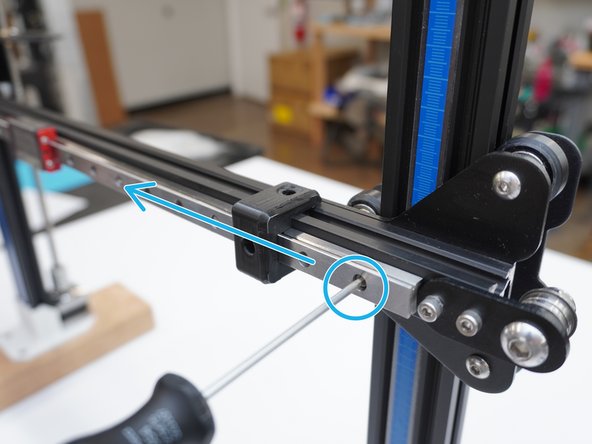
    • Tighten the mounting screws as you go down. Making sure to slide down, slide the linear rail guide down as each screw is tightened.

  5. CR-10 X Linear Rail Replacement, X Carriage install: passo 5, imagem 1 %32 CR-10 X Linear Rail Replacement, X Carriage install: passo 5, imagem 2 %32 CR-10 X Linear Rail Replacement, X Carriage install: passo 5, imagem 3 %32
    • Belt adaptor

    • 4x M3x8 SHCS

    • 3x M3 split washers

    • M3 Hex nuts

    • Install the M3x8 SHCS screw with M3 Split washer in to the X carriage adaptor plate and mount to the Rail block.

    • Push up on the belt bracket, it is square against the bottom of the carriage block.

    • Note: If screws will not start, threading in. Spin the screws counterclockwise until you hear a click, and then tighten the screws evenly in an X pattern until they are fully tightened. This is to ensure that the threads do not get damaged.

    • Note, reference Hotend Mounting Instructions section before mounting the MGN 12 Adaptor Plates to the linear rail block. For installing Hex Nuts to the back of the Adaptors.

Linha de Chegada

AJ Pereira

Membro desde: 05/29/20

2.679 Reputação

Autoria de 16 guias

Equipe

Tiny Machines 3D Membro de Tiny Machines 3D

Community

Membros da 5

Autoria de 40 guias

0 comentários

Adicione um comentário

Exibir estatísticas:

Últimas 24 horas: 1

Últimos 7 dias: 5

Últimos 30 dias: 8

Duração total: 531