Ir para o conteúdo principal

Esta versão pode conter edições incorretas. Mude para o último instantâneo verificado.

O que você precisa

  1. Este passo não foi traduzido. Ajude a traduzi-lo

    : passo 1, imagem 1 %32 : passo 1, imagem 2 %32
    • Test pump performance by pumping 40 strokes.

    • An effective pump should return at least 10 liters.

  2. Este passo não foi traduzido. Ajude a traduzi-lo

    : passo 2, imagem 1 %32 : passo 2, imagem 2 %32
    • Remove the two pins connecting the handle to the slider.

  3. Este passo não foi traduzido. Ajude a traduzi-lo

    : passo 3, imagem 1 %32 : passo 3, imagem 2 %32
    • Pull the two lever arms away from the slider.

  4. Este passo não foi traduzido. Ajude a traduzi-lo

    : passo 4, imagem 1 %32 : passo 4, imagem 2 %32
    • Lift the two pins attaching the pump frame to the head and handle up, off of the pump frame.

  5. Este passo não foi traduzido. Ajude a traduzi-lo

    : passo 5, imagem 1 %32 : passo 5, imagem 2 %32 : passo 5, imagem 3 %32
    • Throughout this step, make sure you support the handle and head with at least three hands.

    • Slide the bearing rod out of the head.

    • Inspect the bearing rod and head for any wear or tear.

  6. Este passo não foi traduzido. Ajude a traduzi-lo

    : passo 6, imagem 1 %32
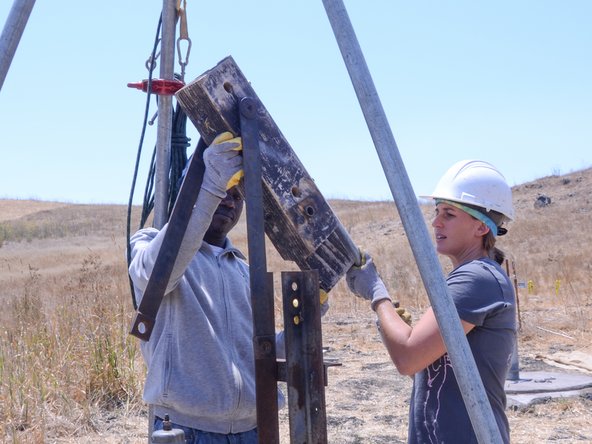
    • Remove the head and handle, and place them on a clean surface to prevent contamination.

  7. Este passo não foi traduzido. Ajude a traduzi-lo

    : passo 7, imagem 1 %32 : passo 7, imagem 2 %32
    • Firmly lift the riser main slider with two hands.

    • Use caution not to drop the riser main, as this can damage the pump cylinder.

  8. Este passo não foi traduzido. Ajude a traduzi-lo

    : passo 8, imagem 1 %32 : passo 8, imagem 2 %32 : passo 8, imagem 3 %32
    • Use a pipe wrench to fully loosen the above grade riser pipe.

  9. Este passo não foi traduzido. Ajude a traduzi-lo

    : passo 9, imagem 1 %32 : passo 9, imagem 2 %32 : passo 9, imagem 3 %32
    • Lift the slider and riser main pipe.

    • Place a pump rod clamp around the rod, and tighten it securely against the pump rod.

    • Carefully lower the riser main and slider to allow it to rest on the rod clamp.

  10. Este passo não foi traduzido. Ajude a traduzi-lo

    : passo 10, imagem 1 %32 : passo 10, imagem 2 %32 : passo 10, imagem 3 %32
    • Loosen and remove both the pump rod jam nut and pump rod nut on the top of the slider.

  11. Este passo não foi traduzido. Ajude a traduzi-lo

    : passo 11, imagem 1 %32 : passo 11, imagem 2 %32
    • Remove the riser main slider, and inspect it for wear and tear.

    • Set the slider in a sanitary place to prevent contamination.

Linha de Chegada

Jake Devincenzi

Membro desde: 04/18/11

117.301 Reputação

Autoria de 57 guias

0 comentários

Adicione um comentário

Exibir estatísticas:

Últimas 24 horas: 1

Últimos 7 dias: 9

Últimos 30 dias: 11

Duração total: 179