Ir para o conteúdo principal

Bose Wave Radio AWR1-1W Screen Replacement

O que você precisa

  1. Bose Wave Radio AWR1-1W Screen Replacement, Base: passo 1, imagem 1 %32 Bose Wave Radio AWR1-1W Screen Replacement, Base: passo 1, imagem 2 %32
    • Remove the four 19mm Phillips #2 screws from the base of the device.

  2. Bose Wave Radio AWR1-1W Screen Replacement: passo 2, imagem 1 %32 Bose Wave Radio AWR1-1W Screen Replacement: passo 2, imagem 2 %32 Bose Wave Radio AWR1-1W Screen Replacement: passo 2, imagem 3 %32
    • Turn the device over, holding the base on with your thumbs.

    • Hold the device tightly to prevent the base from falling off.

  3. Bose Wave Radio AWR1-1W Screen Replacement: passo 3, imagem 1 %32 Bose Wave Radio AWR1-1W Screen Replacement: passo 3, imagem 2 %32 Bose Wave Radio AWR1-1W Screen Replacement: passo 3, imagem 3 %32
    • Gently lift the top off of the device.

    • Lift in the direction shown to avoid damaging the wires connecting the top and base of the device.

  4. Bose Wave Radio AWR1-1W Screen Replacement: passo 4, imagem 1 %32 Bose Wave Radio AWR1-1W Screen Replacement: passo 4, imagem 2 %32 Bose Wave Radio AWR1-1W Screen Replacement: passo 4, imagem 3 %32
    • Pinch and unplug the white connector from the device.

  5. Bose Wave Radio AWR1-1W Screen Replacement: passo 5, imagem 1 %32 Bose Wave Radio AWR1-1W Screen Replacement: passo 5, imagem 2 %32 Bose Wave Radio AWR1-1W Screen Replacement: passo 5, imagem 3 %32
    • Gently pinch and pull on the white ribbon cable to disconnect it from the base.

  6. Bose Wave Radio AWR1-1W Screen Replacement: passo 6, imagem 1 %32
    • The base should now be completely detached from the device.

  7. Bose Wave Radio AWR1-1W Screen Replacement, Front Grill: passo 7, imagem 1 %32 Bose Wave Radio AWR1-1W Screen Replacement, Front Grill: passo 7, imagem 2 %32 Bose Wave Radio AWR1-1W Screen Replacement, Front Grill: passo 7, imagem 3 %32
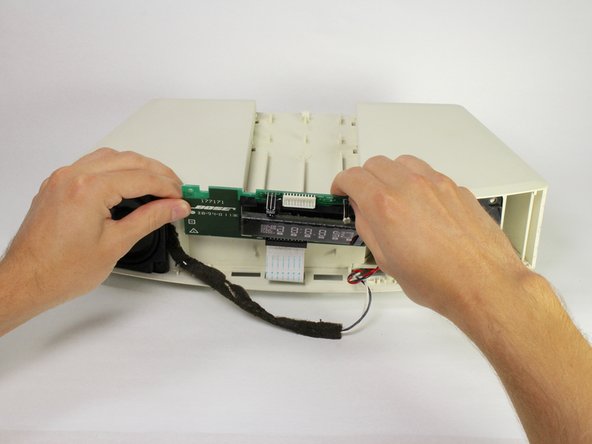
    • Wedge the spudger between the top and front panel on the right side of the device.

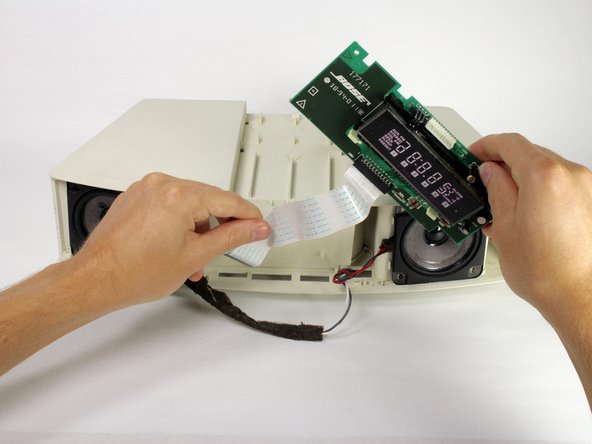
    • Push down on the spudger, lifting the front panel away from the top panel until it pops out of the right side.

    • Repeat for the left side of the device.

    • Too much pressure may break the panel, but it should flex slightly before it pops out.

  8. Bose Wave Radio AWR1-1W Screen Replacement: passo 8, imagem 1 %32 Bose Wave Radio AWR1-1W Screen Replacement: passo 8, imagem 2 %32 Bose Wave Radio AWR1-1W Screen Replacement: passo 8, imagem 3 %32
    • Once the panel is released on the left side, wedge the spudger between the top panel and front grill of the device as shown.

    • Apply pressure and move the spudger upward until the front grill pops out.

    • Repeat for the right side of the device.

  9. Bose Wave Radio AWR1-1W Screen Replacement: passo 9, imagem 1 %32
    • Lift the front grill away from the device.

  10. Bose Wave Radio AWR1-1W Screen Replacement, Button Panel: passo 10, imagem 1 %32 Bose Wave Radio AWR1-1W Screen Replacement, Button Panel: passo 10, imagem 2 %32
    • Turn the device around.

    • Wedge the spudger into the larger part of the gap under the back of the device.

  11. Bose Wave Radio AWR1-1W Screen Replacement: passo 11, imagem 1 %32
    • Move the spudger up until the button panel is loose.

    • Push forward on the back of the button panel to disconnect the panel from the top of the device.

  12. Bose Wave Radio AWR1-1W Screen Replacement: passo 12, imagem 1 %32 Bose Wave Radio AWR1-1W Screen Replacement: passo 12, imagem 2 %32
    • Turn the device around.

    • Pull the button panel forward with one hand and push the screen assembly into the device with the other to disconnect the button panel.

  13. Bose Wave Radio AWR1-1W Screen Replacement, Screen: passo 13, imagem 1 %32 Bose Wave Radio AWR1-1W Screen Replacement, Screen: passo 13, imagem 2 %32 Bose Wave Radio AWR1-1W Screen Replacement, Screen: passo 13, imagem 3 %32
    • Gently pull the top of the screen assembly away from the device.

  14. Bose Wave Radio AWR1-1W Screen Replacement: passo 14, imagem 1 %32 Bose Wave Radio AWR1-1W Screen Replacement: passo 14, imagem 2 %32
    • Lift the screen assembly upward and pull the white wire strip out of the device.

Conclusão

To reassemble your device, follow these instructions in reverse order.

4 outras pessoas executaram este guia.

Cassie Harriman

Membro desde: 04/18/17

1.033 Reputação

Autoria de 5 guias

Equipe

Cal Poly, Team S15-G2, Banghart Spring 2017 Membro de Cal Poly, Team S15-G2, Banghart Spring 2017

CPSU-BANGHART-S17S15G2

Membros da 4

Autoria de 6 guias

5 comentários

Great! This device is the best wave system in sound accurate. All frequencies sounds clear!!! Awesome!!!

srmrs - Responder

Nicely done.  Love the details.  Just one question - where can I get the replacement screen?

Patsy Hamilton - Responder

Instructions were PERFECT! Thank you. I found my replacement screen on ebay for $25, took a chance that it would work as stated by the seller. Otherwise I would have thrown the radio away.

John Stine - Responder

I performed the repair as directed. It was easy especially if you have a plastic spung to work with. Problem comes from the new display once installed shows all the characters? Unplugged it and re-plugged but still stuck in all character test mode?

plhamp - Responder

How to purchase White wire strip

Bruce Ebneter - Responder

Adicione um comentário

Exibir estatísticas:

Últimas 24 horas: 9

Últimos 7 dias: 35

Últimos 30 dias: 115

Duração total: 9,992