Ir para o conteúdo principal

Bose QuietComfort 35 Earpad Replacement

O que você precisa

  1. Bose QuietComfort 35 Earpad Replacement, Earpad: passo 1, imagem 1 %32 Bose QuietComfort 35 Earpad Replacement, Earpad: passo 1, imagem 2 %32 Bose QuietComfort 35 Earpad Replacement, Earpad: passo 1, imagem 3 %32
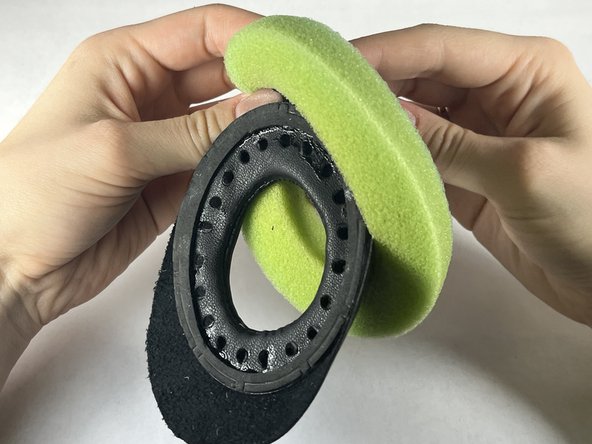
    • Reach a thumb under the damaged foam earpad and pull to remove from headphones.

  2. Bose QuietComfort 35 Earpad Replacement: passo 2, imagem 1 %32 Bose QuietComfort 35 Earpad Replacement: passo 2, imagem 2 %32 Bose QuietComfort 35 Earpad Replacement: passo 2, imagem 3 %32
    • Locate the plastic oval ring attached to the foam ear pad.

    • Gently pull apart the plastic ring and leather fabric until separated.

  3. Bose QuietComfort 35 Earpad Replacement: passo 3, imagem 1 %32 Bose QuietComfort 35 Earpad Replacement: passo 3, imagem 2 %32 Bose QuietComfort 35 Earpad Replacement: passo 3, imagem 3 %32
    • Rip the leather exterior until green foam is visible.

    • Remove green foam.

    • Dispose of damaged leather.

  4. Bose QuietComfort 35 Earpad Replacement: passo 4, imagem 1 %32 Bose QuietComfort 35 Earpad Replacement: passo 4, imagem 2 %32 Bose QuietComfort 35 Earpad Replacement: passo 4, imagem 3 %32
    • Print the linked pattern.

    • Cut out the pattern using the solid black lines.

    • Trace the pattern onto the new leather.

  5. Bose QuietComfort 35 Earpad Replacement: passo 5, imagem 1 %32 Bose QuietComfort 35 Earpad Replacement: passo 5, imagem 2 %32
    • Cut out the leather following the traced lines.

  6. Bose QuietComfort 35 Earpad Replacement: passo 6, imagem 1 %32 Bose QuietComfort 35 Earpad Replacement: passo 6, imagem 2 %32
    • Using the pattern as a guide, mark holes on the smaller donut with a pencil

    • Punch holes with the leather punch tool

  7. Bose QuietComfort 35 Earpad Replacement: passo 7, imagem 1 %32 Bose QuietComfort 35 Earpad Replacement: passo 7, imagem 2 %32 Bose QuietComfort 35 Earpad Replacement: passo 7, imagem 3 %32
    • Align the smaller donut on top of the larger donut

    • Make sure the leather right sides (the side of the leather you want to show) are facing each other

    • Using a thread and a needle, sew the two donuts together at the center of the donut using a whip stitch

  8. Bose QuietComfort 35 Earpad Replacement: passo 8, imagem 1 %32 Bose QuietComfort 35 Earpad Replacement: passo 8, imagem 2 %32
    • Turn the donut inside out

    • Make sure the leather right sides (the side of the leather you want to show) are facing away from each other

  9. Bose QuietComfort 35 Earpad Replacement: passo 9, imagem 1 %32 Bose QuietComfort 35 Earpad Replacement: passo 9, imagem 2 %32 Bose QuietComfort 35 Earpad Replacement: passo 9, imagem 3 %32
    • Buff the outer edge of the small donut with a nail file

    • Glue the outer edge of the small donut with fabric glue

    • Leave the glue to dry for 5 minutes

  10. Bose QuietComfort 35 Earpad Replacement: passo 10, imagem 1 %32 Bose QuietComfort 35 Earpad Replacement: passo 10, imagem 2 %32
    • Buff the inner edge of the plastic ring

    • Glue the inner edge of the plastic ring

  11. Bose QuietComfort 35 Earpad Replacement: passo 11, imagem 1 %32 Bose QuietComfort 35 Earpad Replacement: passo 11, imagem 2 %32
    • Attach the plastic ring (glue side down) to the smaller donut

    • Leave to dry for 20 minutes

  12. Bose QuietComfort 35 Earpad Replacement: passo 12, imagem 1 %32 Bose QuietComfort 35 Earpad Replacement: passo 12, imagem 2 %32
    • Slide the leather ring through the cushion, leaving the plastic ring on the other side

  13. Bose QuietComfort 35 Earpad Replacement: passo 13, imagem 1 %32 Bose QuietComfort 35 Earpad Replacement: passo 13, imagem 2 %32
    • Apply glue to the edges of the leather donut

    • Put an object in between the donut for a better drying process

    • Leave to dry for 5 minutes

  14. Bose QuietComfort 35 Earpad Replacement: passo 14, imagem 1 %32 Bose QuietComfort 35 Earpad Replacement: passo 14, imagem 2 %32 Bose QuietComfort 35 Earpad Replacement: passo 14, imagem 3 %32
    • Fold the leather down to the plastic ring, wrapping around the cushion ring

    • Straighten out the creases in the leather ring

  15. Bose QuietComfort 35 Earpad Replacement: passo 15, imagem 1 %32 Bose QuietComfort 35 Earpad Replacement: passo 15, imagem 2 %32
    • Use a paper clip to hold the pieces in place while letting glue dry

    • Leave to dry for 20 minutes

  16. Bose QuietComfort 35 Earpad Replacement: passo 16, imagem 1 %32 Bose QuietComfort 35 Earpad Replacement: passo 16, imagem 2 %32 Bose QuietComfort 35 Earpad Replacement: passo 16, imagem 3 %32
    • Attach the leather earpads back onto the headphone

    • Apply light pressure to secure the earpads into place

Conclusão

To reassemble your device, follow these instructions in reverse order.

2 outras pessoas executaram este guia.

Documentos anexados

Johnson Ou

Membro desde: 02/01/24

298 Reputação

Autoria de 1 guia

Equipe

UC Davis, Team 4-2, Andersen Winter 2024 Membro de UC Davis, Team 4-2, Andersen Winter 2024

UCD-ANDERSEN-W24S4G2

Membros da 3

1 Guia de autoria

0 comentários

Adicione um comentário

Exibir estatísticas:

Últimas 24 horas: 0

Últimos 7 dias: 1

Últimos 30 dias: 11

Duração total: 103