Esta versão pode conter edições incorretas. Mude para o último instantâneo verificado.
O que você precisa
-
Este passo não foi traduzido. Ajude a traduzi-lo
-
Turn the device upside down.
-
Using your finger, slide the silver cover release button towards the top of the device.
-
Lift and remove the back cover.
-
-
Este passo não foi traduzido. Ajude a traduzi-lo
-
Using your fingernails, lift the sides of the battery.
-
Remove the battery.
-
-
Este passo não foi traduzido. Ajude a traduzi-lo
-
Orient the device so that the screen is facing the ground.
-
Using your finger, gently lift the top of the SIM card.
-
-
Este passo não foi traduzido. Ajude a traduzi-lo
-
Using a T6 Torx screwdriver, remove the four screws from the bottom half of the device.
-
-
-
Este passo não foi traduzido. Ajude a traduzi-lo
-
Orient the device so that the screen is facing you.
-
Using a spudger, remove the ear piece cover.
-
-
Este passo não foi traduzido. Ajude a traduzi-lo
-
Using a T6 Torx screwdriver, remove the two screws from the top corners of the device.
-
-
Este passo não foi traduzido. Ajude a traduzi-lo
-
Remove the back chassis by gently pulling the chassis back and forth.
-
-
Este passo não foi traduzido. Ajude a traduzi-lo
-
Orient the device so that the screen is facing the ground, and the top of the phone is facing you.
-
Using a pair of tweezers, lift and remove the following:
-
The two round connectors on the top of the mother board.
-
The flat connector in the lower corner of the mother board.
-
-
Este passo não foi traduzido. Ajude a traduzi-lo
-
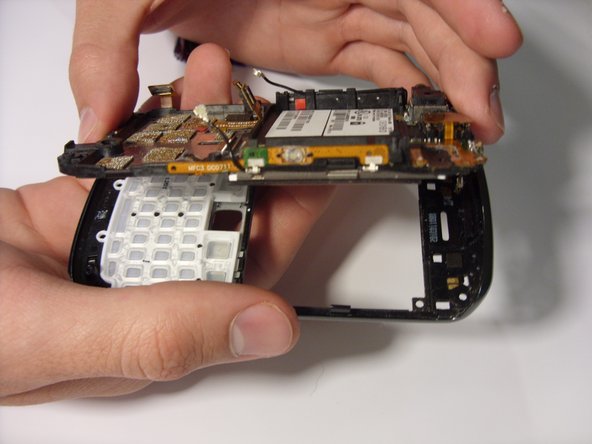
Using your fingers, carefully lift and remove the mother board.
-
-
Este passo não foi traduzido. Ajude a traduzi-lo
-
Using a pair of tweezers, remove the three ribbon connectors.
-
-
Este passo não foi traduzido. Ajude a traduzi-lo
-
Remove the mother board by lifting the board upward.
-
-
Este passo não foi traduzido. Ajude a traduzi-lo
-
Using a pry tool, lift up on the four tabs located on the edges of the faceplate.
-
Remove the faceplate by lifting the plate upward.
-
-
Este passo não foi traduzido. Ajude a traduzi-lo
-
Turn the phone so it is facing up.
-
Use the plastic pry tool to gently pry out the screen.
-


Cancelar: não concluí este guia.
3 outras pessoas executaram este guia.
Equipe

Clemson, Team 2-5, Benson Spring 2012 Membro de Clemson, Team 2-5, Benson Spring 2012
CLEM-BENSON-S12S2G5
Membros da 2
Autoria de 14 guias