Ir para o conteúdo principal

Back Panel Removal

O que você precisa

  1. Back Panel Removal, Battery: passo 1, imagem 1 %32
    • Power down the computer and unplug the power adapter.

  2. Back Panel Removal: passo 2, imagem 1 %32
    • Flip the laptop upside down. Locate the two latches on both sides of the battery.

  3. Back Panel Removal: passo 3, imagem 1 %32 Back Panel Removal: passo 3, imagem 2 %32 Back Panel Removal: passo 3, imagem 3 %32
    • Slide the latch on the right outwards, releasing the lock. The latch stays unlocked once moved.

    • Simultaneously slide the latch on the left outwards while pulling the battery towards you.

    • Do not touch the metal connectors on the laptop and the battery.

  4. Back Panel Removal, Back Panel Removal: passo 4, imagem 1 %32
    • Remove the single captive screw on the back panel with your Phillips #1 screwdriver.

  5. Back Panel Removal: passo 5, imagem 1 %32 Back Panel Removal: passo 5, imagem 2 %32
    • Pry the removal tab up. You will feel and hear the first clip release, popping up slightly.

    • Work your way around the border of the panel, releasing the rest of the clips.

    • Once all clips are released, lift the cover up and pull towards you.

Conclusão

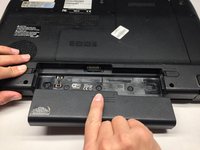
To replace the back panel, follow the steps in reverse.

2 outras pessoas executaram este guia.

Austin Bons

Membro desde: 09/22/16

1.131 Reputação

Autoria de 8 guias

Equipe

UC Davis, Team 2-2, Oliver Fall 2016 Membro de UC Davis, Team 2-2, Oliver Fall 2016

UCD-OLIVER-F16S2G2

Membros da 5

Autoria de 10 guias

0 comentários

Adicione um comentário

Exibir estatísticas:

Últimas 24 horas: 2

Últimos 7 dias: 16

Últimos 30 dias: 58

Duração total: 7,415