Ir para o conteúdo principal
BRCK v1 Modem  Replacement

BRCK v1 Modem Replacement

Jeret Buerger

Jeret Buerger e 4 outros colaboradores

Última atualização em May 7, 2024

15 minutos
Moderado

Introdução

Ir para o passo 1

Using a hex 2.0 driver, you will take off the top cover in order to access the modem. With a pair of tweezers you will be able to remove and replace the modem.

O que você precisa

Ferramentas

  1. BRCK v1 Modem  Replacement, Top Cover: passo 1, imagem 1 %32
    • Place the face of the device showing BRCK face up.

  2. BRCK v1 Modem  Replacement: passo 2, imagem 1 %32
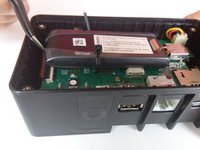
    • Remove the four screws(4mm hex head) on the corners of the device with a Hex 2.0 Screwdriver.

  3. BRCK v1 Modem  Replacement: passo 3, imagem 1 %32
    • Remove the top cover.

  4. BRCK v1 Modem  Replacement, Modem: passo 4, imagem 1 %32
    • Cut the black zip tie holding the modem down.

    • Caution By cutting the zip tie, you void any manufacturer warranty you may have on the device.

  5. BRCK v1 Modem  Replacement: passo 5, imagem 1 %32
    • Remove the connection located on the edge of the modem.

  6. BRCK v1 Modem  Replacement: passo 6, imagem 1 %32 BRCK v1 Modem  Replacement: passo 6, imagem 2 %32
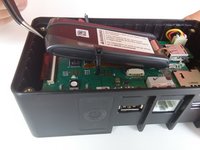
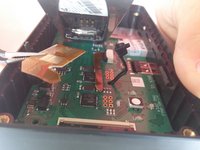
    • Slightly lift the modem to reveal the brown ribbon connector and metal connection plate, located on the bottom of the modem.
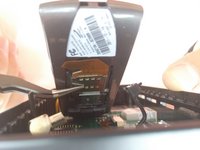
  7. BRCK v1 Modem  Replacement: passo 7, imagem 1 %32 BRCK v1 Modem  Replacement: passo 7, imagem 2 %32 BRCK v1 Modem  Replacement: passo 7, imagem 3 %32
    Ferramenta utilizada neste passo:
    Tweezers
    $4.99
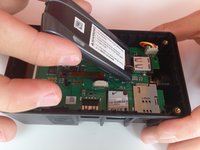
    • Using your tweezers, gently push on the metal plate and slide it down toward the base of the modem to release the locking mechanism.

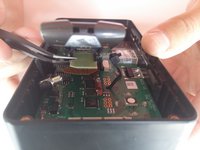
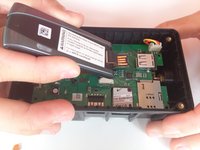
    • Lower the plate and gently pull the ribbon out of the face plate.

    • Caution Be extremely gentle while preforming this step. The ribbon is brittle and prone to breaking if bent too much. Make sure you go slowly so that you do not damage the device.

  8. BRCK v1 Modem  Replacement: passo 8, imagem 1 %32 BRCK v1 Modem  Replacement: passo 8, imagem 2 %32
    • Remove the modem from the device.

Conclusão

To reassemble your device, follow these instructions in reverse order.

Jeret Buerger

Membro desde: 04/01/15

501 Reputação

Autoria de 5 guias

Equipe

Cal Poly, Team 12-3, Lancaster Spring 2015 Membro de Cal Poly, Team 12-3, Lancaster Spring 2015

CPSU-LANCASTER-S15S12G3

3 Membros

Autoria de 14 guias

0Comentários do guia

Comentar

Visualizações:

Últimas 24 horas: 1

Últimos 7 dias: 3

Últimos 30 dias: 6

Ao todo: 295