Ir para o conteúdo principal

Asus X751MA-DH01TQ Touchpad Replacement

O que você precisa

  1. Asus X751MA-DH01TQ Touchpad Replacement, Touchpad: passo 1, imagem 1 %32 Asus X751MA-DH01TQ Touchpad Replacement, Touchpad: passo 1, imagem 2 %32
    • Turn the laptop upside down

    • Unscrew the ten screws on the bottom with the PH00 screwdriver bit.

  2. Asus X751MA-DH01TQ Touchpad Replacement: passo 2, imagem 1 %32 Asus X751MA-DH01TQ Touchpad Replacement: passo 2, imagem 2 %32 Asus X751MA-DH01TQ Touchpad Replacement: passo 2, imagem 3 %32
    • Open up the laptop.

    • Using the plastic opening tool, open up and disconnect the keyboard from the base.

    • Take the keyboard off and put it upside down.

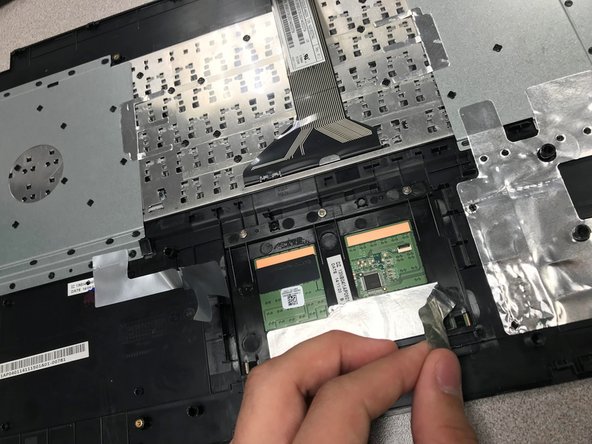
  3. Asus X751MA-DH01TQ Touchpad Replacement: passo 3, imagem 1 %32 Asus X751MA-DH01TQ Touchpad Replacement: passo 3, imagem 2 %32 Asus X751MA-DH01TQ Touchpad Replacement: passo 3, imagem 3 %32
    • Peel off the silver stickers that are attaching the touch pad to the back part of the keyboard.

  4. Asus X751MA-DH01TQ Touchpad Replacement: passo 4, imagem 1 %32 Asus X751MA-DH01TQ Touchpad Replacement: passo 4, imagem 2 %32
    • Unscrew the three 4mm screws on the touch pad with a PH00 screwdriver.

  5. Asus X751MA-DH01TQ Touchpad Replacement: passo 5, imagem 1 %32
    • Grab the touch pad and slide it out to replace it.

Conclusão

To reassemble your device, follow these instructions in reverse order.

0 comentários

Adicione um comentário

Exibir estatísticas:

Últimas 24 horas: 0

Últimos 7 dias: 1

Últimos 30 dias: 3

Duração total: 383