Ir para o conteúdo principal

Asus VivoBook X202E-DB21T Display Replacement

O que você precisa

  1. Asus VivoBook X202E-DB21T Display Replacement, Battery: passo 1, imagem 1 %32 Asus VivoBook X202E-DB21T Display Replacement, Battery: passo 1, imagem 2 %32
    • Flip the device such that the labels are on top.

    • Use a Phillips #1 screwdriver to remove the four 8mm screws near the back.

    • Use the same screwdriver to remove the four 5mm screws in the front.

    • Use the same screwdriver to remove the single 9mm screw in the center.

    • Make sure that the device is powered down and unplugged.

  2. Asus VivoBook X202E-DB21T Display Replacement: passo 2, imagem 1 %32 Asus VivoBook X202E-DB21T Display Replacement: passo 2, imagem 2 %32
    • Remove the back cover by gently prying with a spudger.

  3. Asus VivoBook X202E-DB21T Display Replacement: passo 3, imagem 1 %32 Asus VivoBook X202E-DB21T Display Replacement: passo 3, imagem 2 %32
    • Remove the eight 5mm screws using a Phillips #1 screwdriver.

    • Do not puncture the battery.

  4. Asus VivoBook X202E-DB21T Display Replacement: passo 4, imagem 1 %32
    • Disconnect the battery ribbon cable from the motherboard.

  5. Asus VivoBook X202E-DB21T Display Replacement: passo 5, imagem 1 %32
    • Remove the battery from the laptop.

  6. Asus VivoBook X202E-DB21T Display Replacement, Hard Drive: passo 6, imagem 1 %32 Asus VivoBook X202E-DB21T Display Replacement, Hard Drive: passo 6, imagem 2 %32
    • Unscrew the three 4mm screws holding the hard drive to the board.

  7. Asus VivoBook X202E-DB21T Display Replacement: passo 7, imagem 1 %32 Asus VivoBook X202E-DB21T Display Replacement: passo 7, imagem 2 %32
    • Pull on the tab on the left side of the hard drive and slowly disconnect it from the board.

  8. Asus VivoBook X202E-DB21T Display Replacement, Motherboard: passo 8, imagem 1 %32 Asus VivoBook X202E-DB21T Display Replacement, Motherboard: passo 8, imagem 2 %32
    • Unscrew the five 5mm screws holding the left board together.

  9. Asus VivoBook X202E-DB21T Display Replacement: passo 9, imagem 1 %32 Asus VivoBook X202E-DB21T Display Replacement: passo 9, imagem 2 %32
    • Unplug the two connectors on the left board.

  10. Asus VivoBook X202E-DB21T Display Replacement: passo 10, imagem 1 %32 Asus VivoBook X202E-DB21T Display Replacement: passo 10, imagem 2 %32 Asus VivoBook X202E-DB21T Display Replacement: passo 10, imagem 3 %32
    • Remove the single 3mm screw from the sound chip.

    • Unplug the sound chip.

    • Remove the sound chip.

  11. Asus VivoBook X202E-DB21T Display Replacement: passo 11, imagem 1 %32
    • Remove the six 4mm screws holding the fan and CPU cover.

  12. Asus VivoBook X202E-DB21T Display Replacement: passo 12, imagem 1 %32 Asus VivoBook X202E-DB21T Display Replacement: passo 12, imagem 2 %32
    • Unplug the fan.

    • Remove the fan and CPU cover.

  13. Asus VivoBook X202E-DB21T Display Replacement: passo 13, imagem 1 %32
    • Unscrew the nine 4mm screws holding the right board together.

  14. Asus VivoBook X202E-DB21T Display Replacement: passo 14, imagem 1 %32
    • Remove the two remaining connectors on the board.

  15. Asus VivoBook X202E-DB21T Display Replacement: passo 15, imagem 1 %32
    • Remove the right board.

  16. Asus VivoBook X202E-DB21T Display Replacement, Display: passo 16, imagem 1 %32
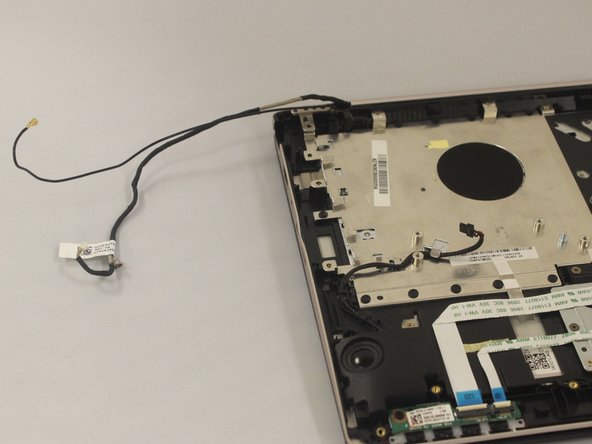
    • Unscrew the three 5mm screws holding the display to the main body of the computer.

  17. Asus VivoBook X202E-DB21T Display Replacement: passo 17, imagem 1 %32 Asus VivoBook X202E-DB21T Display Replacement: passo 17, imagem 2 %32
    • Unhook the cables coming from the display.

  18. Asus VivoBook X202E-DB21T Display Replacement: passo 18, imagem 1 %32
    • Tilt the screen away from the main body of the computer.

    • Remove the screen.

Conclusão

To reassemble your device, follow these instructions in reverse order.

0 comentários

Adicione um comentário

Exibir estatísticas:

Últimas 24 horas: 0

Últimos 7 dias: 0

Últimos 30 dias: 2

Duração total: 635