Ir para o conteúdo principal

Asus Transformer T100 Button Module Replacement

O que você precisa

  1. Asus Transformer T100 Button Module Replacement, Rear Cover: passo 1, imagem 1 %32 Asus Transformer T100 Button Module Replacement, Rear Cover: passo 1, imagem 2 %32
    • Separate the tablet from the base by pressing the large silver button below the tablet. The silver button is located at the base of the tablet.

    • Remove the tablet by lifting up.

  2. Asus Transformer T100 Button Module Replacement: passo 2, imagem 1 %32 Asus Transformer T100 Button Module Replacement: passo 2, imagem 2 %32
    • Insert the opening tool into the seam of the tablet casing and gently pry upwards.

    • With a little force, you will feel the clips release.

  3. Asus Transformer T100 Button Module Replacement: passo 3, imagem 1 %32
    • Slide the tool along all four edges of the tablet, making sure that all the clips are released.

    • Do not break these clips; otherwise, the screen will become less secure.

  4. Asus Transformer T100 Button Module Replacement: passo 4, imagem 1 %32 Asus Transformer T100 Button Module Replacement: passo 4, imagem 2 %32
    • Remove the rear casing.

  5. Asus Transformer T100 Button Module Replacement, Button Module: passo 5, imagem 1 %32
    Ferramenta utilizada nesse passo:
    Tweezers
    $4.99
    Comprar
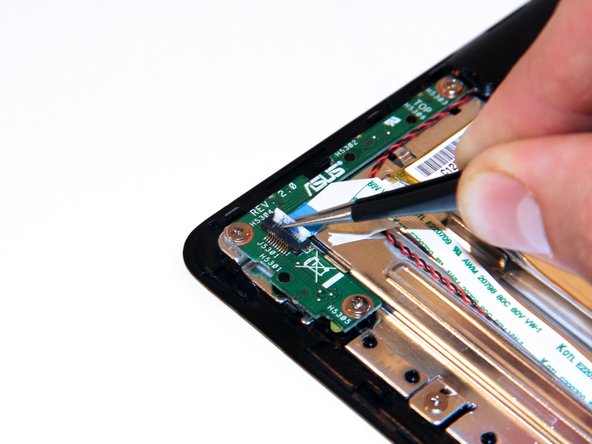
    • Unclip the white connection clip using a pair of tweezers.

  6. Asus Transformer T100 Button Module Replacement: passo 6, imagem 1 %32 Asus Transformer T100 Button Module Replacement: passo 6, imagem 2 %32
    • Pull the connection apparatus from the connection clip on the board using a pair of tweezers.

  7. Asus Transformer T100 Button Module Replacement: passo 7, imagem 1 %32
    • Gently fold the connection apparatus back away from your work area.

  8. Asus Transformer T100 Button Module Replacement: passo 8, imagem 1 %32 Asus Transformer T100 Button Module Replacement: passo 8, imagem 2 %32 Asus Transformer T100 Button Module Replacement: passo 8, imagem 3 %32
    • Remove the screws using a Phillips Head #1 screwdriver.

    • Remove the power button module.

Conclusão

To reassemble your device, follow these instructions in reverse order.

4 outras pessoas executaram este guia.

Taylor Pantiga

Membro desde: 04/14/14

1.596 Reputação

Autoria de 6 guias

Equipe

Cal Poly, Team 13-31, Maness Spring 2014 Membro de Cal Poly, Team 13-31, Maness Spring 2014

CPSU-MANESS-S14S13G31

Membros da 3

Autoria de 6 guias

Um comentário

My problem is that when reinstalltng the back cover the button does not fit the button module to press the on/off switch. The switch works allright.

What can i do? At this moment I can only switch the tablet on after removing the back cover.

Rudolf Guys - Responder

Adicione um comentário

Exibir estatísticas:

Últimas 24 horas: 0

Últimos 7 dias: 5

Últimos 30 dias: 22

Duração total: 5,983