Ir para o conteúdo principal

Asus R510LA-RS71 Motherboard Replacement

O que você precisa

  1. Asus R510LA-RS71 Motherboard Replacement, Battery: passo 1, imagem 1 %32 Asus R510LA-RS71 Motherboard Replacement, Battery: passo 1, imagem 2 %32
    • Locate the locking mechanisms that keep the battery in place and slide them outwards.

    • The right mechanism will lock in place, the left one you will need to hold in place.

  2. Asus R510LA-RS71 Motherboard Replacement: passo 2, imagem 1 %32 Asus R510LA-RS71 Motherboard Replacement: passo 2, imagem 2 %32
    • Use your right thumb to slide the right side of the battery out, then the left side.

  3. Asus R510LA-RS71 Motherboard Replacement, Hard Drive: passo 3, imagem 1 %32 Asus R510LA-RS71 Motherboard Replacement, Hard Drive: passo 3, imagem 2 %32
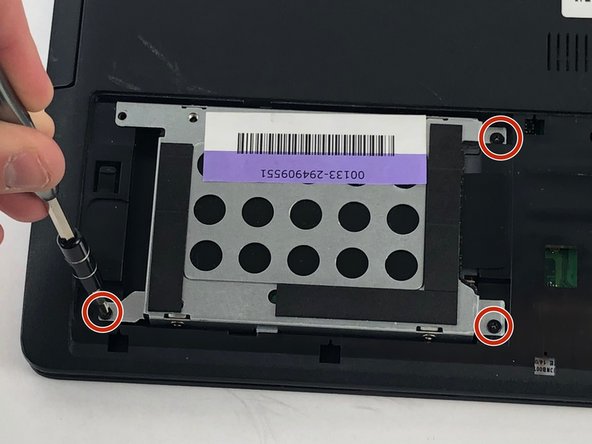
    • Remove the bottom left and right 12.7mm screws using a JIS 00 screwdriver.

  4. Asus R510LA-RS71 Motherboard Replacement: passo 4, imagem 1 %32
    • Slide back and remove the protective plating on the back of the laptop.

  5. Asus R510LA-RS71 Motherboard Replacement: passo 5, imagem 1 %32
    • Again with the JIS 00, unscrew the three 5.7mm screws holding the hard drive in place. These can be found on small brackets on the four corners of the drive.

  6. Asus R510LA-RS71 Motherboard Replacement: passo 6, imagem 1 %32 Asus R510LA-RS71 Motherboard Replacement: passo 6, imagem 2 %32 Asus R510LA-RS71 Motherboard Replacement: passo 6, imagem 3 %32
    • Slide the hard drive to the left, then remove it by lifting it from the compartment it is resting in.

  7. Asus R510LA-RS71 Motherboard Replacement, RAM: passo 7, imagem 1 %32 Asus R510LA-RS71 Motherboard Replacement, RAM: passo 7, imagem 2 %32
    • Using the JIS 00 screwdriver, remove the bottom left/right 12.7mm screws located on the back of the laptop.

  8. Asus R510LA-RS71 Motherboard Replacement: passo 8, imagem 1 %32 Asus R510LA-RS71 Motherboard Replacement: passo 8, imagem 2 %32
    • Slide and lift off the bottom cover.

  9. Asus R510LA-RS71 Motherboard Replacement: passo 9, imagem 1 %32 Asus R510LA-RS71 Motherboard Replacement: passo 9, imagem 2 %32 Asus R510LA-RS71 Motherboard Replacement: passo 9, imagem 3 %32
    • There should be an exposed area located on the right center of the bottom of the revealed compartment. Move the silver brackets holding the RAM to the side. The RAM will pop out of its hold.

  10. Asus R510LA-RS71 Motherboard Replacement: passo 10, imagem 1 %32
    • Remove the RAM

  11. Asus R510LA-RS71 Motherboard Replacement, Motherboard: passo 11, imagem 1 %32 Asus R510LA-RS71 Motherboard Replacement, Motherboard: passo 11, imagem 2 %32
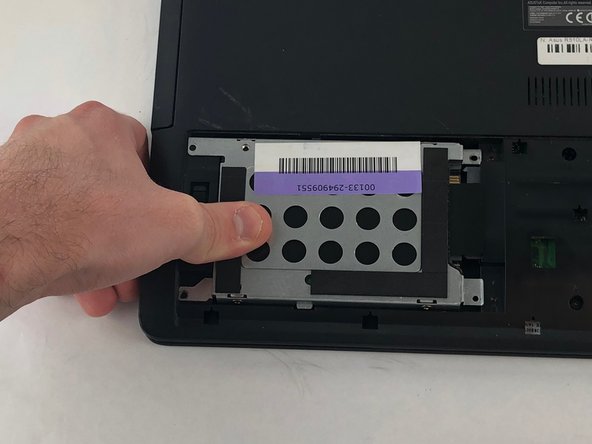
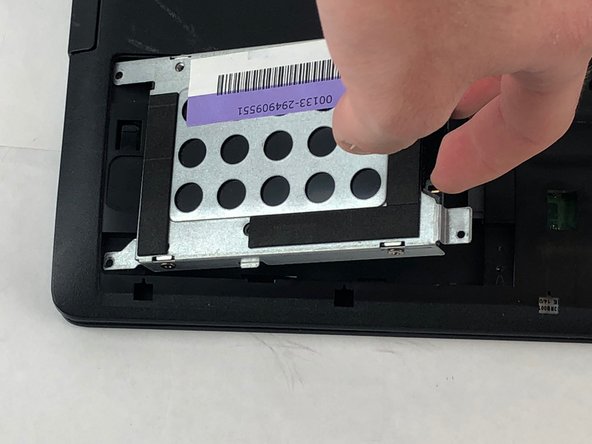
    • With the Battery, Hard Drive, and RAM removed, the laptop should look like this

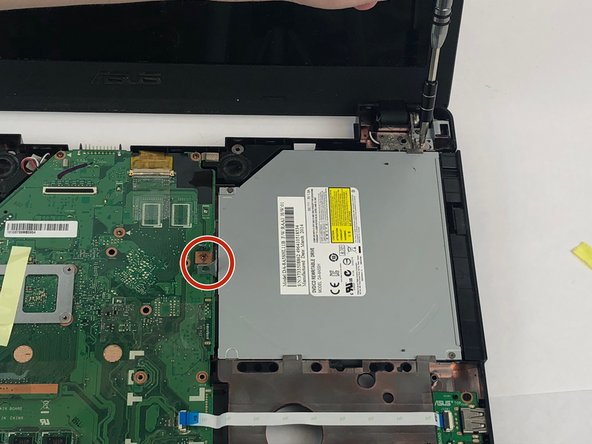
    • Using the JIS 00 screwdriver, remove the 4.7mm screws that are highlighted, there are two in the battery compartment, two on the outsides of the battery locks, and five around the RAM.

  12. Asus R510LA-RS71 Motherboard Replacement: passo 12, imagem 1 %32 Asus R510LA-RS71 Motherboard Replacement: passo 12, imagem 2 %32 Asus R510LA-RS71 Motherboard Replacement: passo 12, imagem 3 %32
    • With all screws removed, slide fingers in the crease, separating the keyboard from the bottom of the computer

    • With the laptop opened, as shown in the second picture, the bottom is the keyboard cover, it should be completely detached, take it and set it aside

  13. Asus R510LA-RS71 Motherboard Replacement: passo 13, imagem 1 %32 Asus R510LA-RS71 Motherboard Replacement: passo 13, imagem 2 %32
    • Flip the laptop over, so it is sitting as it would if you were using it

    • Using the JIS 00 screwdriver, remove all of the 5.7 mm screws remaining in the motherboard and around the fan

  14. Asus R510LA-RS71 Motherboard Replacement: passo 14, imagem 1 %32 Asus R510LA-RS71 Motherboard Replacement: passo 14, imagem 2 %32
    • Ensure the screw keeping the disc drive in place is removed, then slide the drive out

  15. Asus R510LA-RS71 Motherboard Replacement: passo 15, imagem 1 %32 Asus R510LA-RS71 Motherboard Replacement: passo 15, imagem 2 %32
    • Disconnect the chip under the fan, connected to the motherboard (you should have removed the screws in step 3)

  16. Asus R510LA-RS71 Motherboard Replacement: passo 16, imagem 1 %32 Asus R510LA-RS71 Motherboard Replacement: passo 16, imagem 2 %32 Asus R510LA-RS71 Motherboard Replacement: passo 16, imagem 3 %32
    • Remove the two blue and white ribbons

    • To disconnect them, flip the metal bracket that holds them in

  17. Asus R510LA-RS71 Motherboard Replacement: passo 17, imagem 1 %32 Asus R510LA-RS71 Motherboard Replacement: passo 17, imagem 2 %32 Asus R510LA-RS71 Motherboard Replacement: passo 17, imagem 3 %32
    • Remove the gold wire from its port by pulling back the tape, then slide it up and out

  18. Asus R510LA-RS71 Motherboard Replacement: passo 18, imagem 1 %32 Asus R510LA-RS71 Motherboard Replacement: passo 18, imagem 2 %32 Asus R510LA-RS71 Motherboard Replacement: passo 18, imagem 3 %32
    • Remove the wires at the top left of the motherboard, they can just be pulled out

  19. Asus R510LA-RS71 Motherboard Replacement: passo 19, imagem 1 %32 Asus R510LA-RS71 Motherboard Replacement: passo 19, imagem 2 %32 Asus R510LA-RS71 Motherboard Replacement: passo 19, imagem 3 %32
    • To remove the motherboard, stick your fingers through the area where the ram is inserted, lifting it up

    • Then pull out to right at a slightly upwards angle

  20. Asus R510LA-RS71 Motherboard Replacement: passo 20, imagem 1 %32 Asus R510LA-RS71 Motherboard Replacement: passo 20, imagem 2 %32
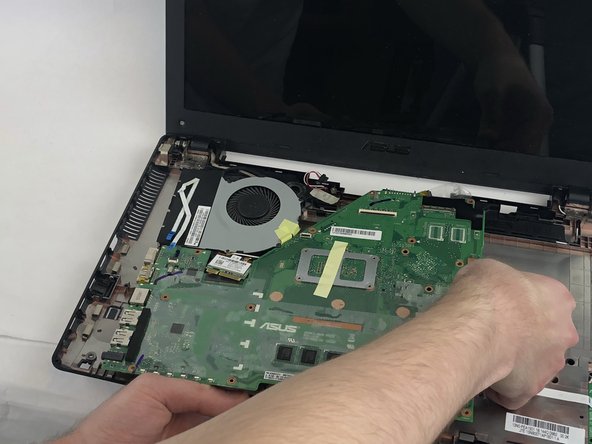
    • Some new motherboards are sold with a fan attached, if the replacement you have does not, then you will need to remove the fan from the current motherboard

    • To do this, flip the motherboard over once it is removed from the laptop and remove the screws from the bracket holding it in place and remove it

Conclusão

To reassemble your device, follow these instructions in reverse order.

Matthew Diaz

Membro desde: 02/15/18

324 Reputação

Autoria de 2 guias

Equipe

USF Tampa, Team S1-G6, Leahy Spring 2018 Membro de USF Tampa, Team S1-G6, Leahy Spring 2018

USFT-LEAHY-S18S1G6

Membros da 4

Autoria de 5 guias

0 comentários

Adicione um comentário

Exibir estatísticas:

Últimas 24 horas: 0

Últimos 7 dias: 0

Últimos 30 dias: 2

Duração total: 649