Ir para o conteúdo principal

Asus F554LA-WS52 Fan Replacement

O que você precisa

  1. Asus F554LA-WS52 Fan Replacement, Disc Drive: passo 1, imagem 1 %32 Asus F554LA-WS52 Fan Replacement, Disc Drive: passo 1, imagem 2 %32
    • Make sure the notebook is off and has been unplugged from any power source.

    • Flip the notebook over and remove the 10 screws from the back plate with a #0 Phillips head screwdriver.

    • Six (6) will be 9.6mm and four (4) will be 12.7mm.

  2. Asus F554LA-WS52 Fan Replacement: passo 2, imagem 1 %32 Asus F554LA-WS52 Fan Replacement: passo 2, imagem 2 %32 Asus F554LA-WS52 Fan Replacement: passo 2, imagem 3 %32
    • With a plastic opening tool, gently lift and remove the back cover to expose the internal components.

    • (Not pictured) Remove the three cables attached to the keyboard and one touch-pad.

  3. Asus F554LA-WS52 Fan Replacement: passo 3, imagem 1 %32 Asus F554LA-WS52 Fan Replacement: passo 3, imagem 2 %32
    • Unscrew the three 5.7 mm hard drive-motherboard connection screws with a #0 Phillips head screwdriver.

    • Remove the small rectangular hard drive-motherboard connection board.

    • (Not pictured) Remove the hard drive.

  4. Asus F554LA-WS52 Fan Replacement: passo 4, imagem 1 %32 Asus F554LA-WS52 Fan Replacement: passo 4, imagem 2 %32
    • Unscrew the four 5.7 mm battery screws with a #0 Phillips head screwdriver.

    • Remove the battery.

  5. Asus F554LA-WS52 Fan Replacement: passo 5, imagem 1 %32 Asus F554LA-WS52 Fan Replacement: passo 5, imagem 2 %32 Asus F554LA-WS52 Fan Replacement: passo 5, imagem 3 %32
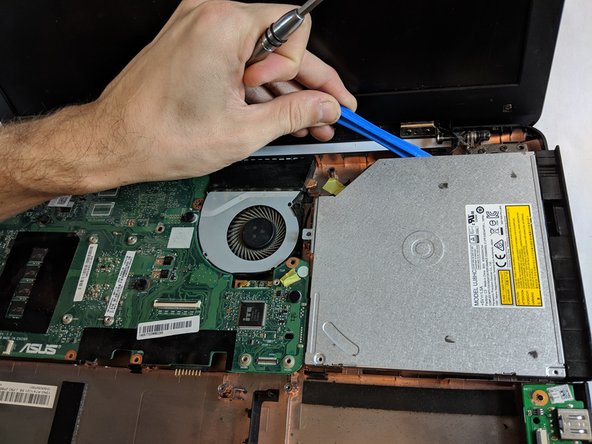
    • Unscrew the two 2.7 mm and one 5.7 mm CD drive screws with the Phillips #00 screwdriver.

    • With the plastic opening tool, gently pry the drive out from the metal brackets that hold it in place.

  6. Asus F554LA-WS52 Fan Replacement, Fan: passo 6, imagem 1 %32
    • Remove the eight 5.7mm screws using the Phillips #0 Screwdriver.

  7. Asus F554LA-WS52 Fan Replacement: passo 7, imagem 1 %32 Asus F554LA-WS52 Fan Replacement: passo 7, imagem 2 %32
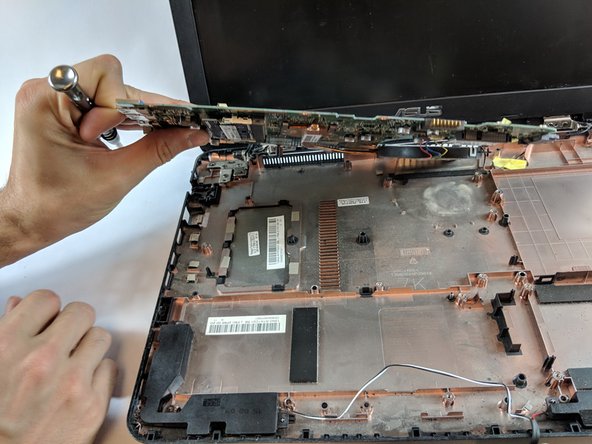
    • Unscrew and remove the two 5.7mm screws from the fan with the Phillips #0 Screwdriver.

    • Gently lift the motherboard and fan to access the components underneath.

  8. Asus F554LA-WS52 Fan Replacement: passo 8, imagem 1 %32
    • Unscrew and remove the four 0.01mm screws using the Phillips #0 Screwdriver from the heatsink.

  9. Asus F554LA-WS52 Fan Replacement: passo 9, imagem 1 %32
    • Gently unplug power strip with fingers or tweezers to remove fan.

    • Gently pull fan from heatsink.

    • Replace fan.

Conclusão

To reassemble your device, follow these instructions in reverse order.

Aaron Ratliff

Membro desde: 10/09/18

527 Reputação

Autoria de 4 guias

Equipe

USF Tampa, Team S1-G2, Leahy Fall 2018 Membro de USF Tampa, Team S1-G2, Leahy Fall 2018

USFT-LEAHY-F18S1G2

Membros da 4

Autoria de 6 guias

Um comentário

It would be nice to identify which screws are long on the case removal to make reassembly easier.

Also it is easier if the laptop is open to unsnap the cover so the screen doesn’t block it.

Roland - Responder

Adicione um comentário

Exibir estatísticas:

Últimas 24 horas: 0

Últimos 7 dias: 0

Últimos 30 dias: 1

Duração total: 595