Esta versão pode conter edições incorretas. Mude para o último instantâneo verificado.
O que você precisa
-
Este passo não foi traduzido. Ajude a traduzi-lo
-
Remove the eight 8.0mm Phillips #0 screws on the bottom of the laptop.
-
Remove the three 6.0mm Phillips #0 screws.
-
-
Este passo não foi traduzido. Ajude a traduzi-lo
-
Open the laptop.
-
Using an iFixit opening tool, pry along the edges of the keyboard.
-
Lift the keyboard and slide it gently towards you.
-
-
Este passo não foi traduzido. Ajude a traduzi-lo
-
Disconnect the two ZIF connectors by prying up the locking bar with a spudger and removing the ribbon cable.
-
-
Este passo não foi traduzido. Ajude a traduzi-lo
-
Remove the six 5.6mm Phillips #0 screws around the battery.
-
-
-
Este passo não foi traduzido. Ajude a traduzi-lo
-
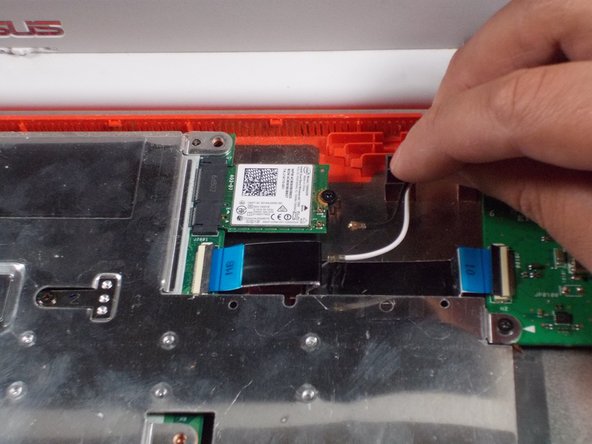
Using your thumb and index finger, pinch the multi-color cable and disconnect it from the motherboard.
-
-
Este passo não foi traduzido. Ajude a traduzi-lo
-
Unplug the black and white cable from the motherboard.
-
-
Este passo não foi traduzido. Ajude a traduzi-lo
-
Peel back the tape covering the plug.
-
Slide the cable towards the screen and out of the input.
-
-
Este passo não foi traduzido. Ajude a traduzi-lo
-
Unscrew the 6 screws (5 millimeter) on the top right and left.
-
-
Este passo não foi traduzido. Ajude a traduzi-lo
-
Gently lift the screen up and away from the laptop.
-
-
Este passo não foi traduzido. Ajude a traduzi-lo
-
Pry off the face panel on the screen using the blue prying tool.
-
-
Este passo não foi traduzido. Ajude a traduzi-lo
-
Remove the four 2mm Phillips #0 screws from the four corners of the screen.
-
-
Este passo não foi traduzido. Ajude a traduzi-lo
-
Gently lift screen
-
Peel back the adhesive covering the cable.
-
Remove the cable to free the screen.
-


Cancelar: não concluí este guia.
Uma outra pessoa concluiu este guia.
Equipe

UMass Dartmouth, Team S1-G7, Simcock Fall 2017 Membro de UMass Dartmouth, Team S1-G7, Simcock Fall 2017
UMASSD-SIMCOCK-F17S1G7
Membros da 3
Autoria de 9 guias
Um comentário
I used this honestly I broke the screen and some of the wires in the screen are severed. Now I know for sure where the wires go and how to deconstruct it. Thank you so much!