Introdução
The LCD in the Apple Thunderbolt Display is the very first part that will have to be taken out no matter what piece inside this device has to be replaced. Because of this, it is essential to know how to carefully remove the LCD from the device. Something that should be noted is that even after screws are removed, don't hastily try pulling the LCD out of its casing because it is still connected to the power and logic board of the display! Once the new screen is in place, make sure that everything is connected like the original LCD was and your device should be as good as new!
Important – LCD Flex Cable Orientation and Connection
When removing or reinstalling the LCD panel, special attention must be paid to the LCD flex cable connecting the panel to the logic board. This cable carries not only the display data signals, but also the power supply lines (LCD_PWR) required for the panel and T-CON controller to operate.
If the flex cable is installed in the wrong orientation, partially inserted, or misaligned:
- The display may show no image,
- The backlight may fail to turn on,
- In rare cases, protective components such as fuses or ferrite beads on the logic board may be damaged.
When reconnecting the flex cable:
- Ensure the gold contact pads face the connector’s internal pins,
- Make sure the cable is fully and evenly seated in the connector,
- Verify that all locking tabs are properly secured.
⚠️ Always double-check all flex cable connections before reconnecting power.
O que você precisa
-
-
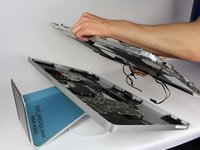
Lay down the display with screen side up.
-
Place the two suction cups on both sides of the top of the screen and make sure to lock them in place.
-
The glass screen is connected to the rest of the display by small magnets. Lift slowly and the screen will come right off.
 Pergunte ao FixBot
-
-
-
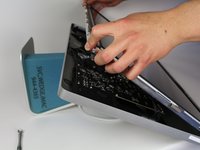
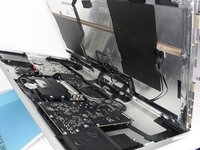
Unscrew the 12 screws around the side edges and the top of the LCD with the TR 10 Screwdriver.
-
-
-
-
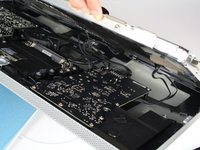
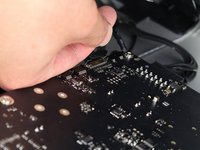
For the first of the four wires (furthest away from the wire that is held in by a screw), grab onto the connector and pull slowly.
-
-
-
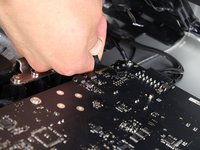
For the next connector, which is right next to the previous wire, there is a piece of tape attached to a metal bar.
-
Flip the metal bar over using the tape as a handle.
-
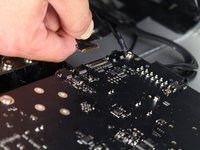
Next, grab onto the connector and slowly pull it from the socket in the logic board.
-
-
-
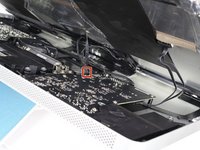
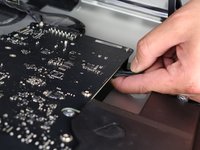
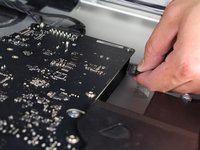
For the connector on the other side of the logic board, grab the connector from underneath and carefully pull it from the board.
-
-
-
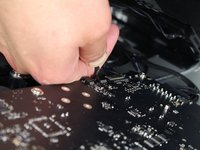
For the last wire connecting to the LCD, use your T 10 Screwdriver to remove the screw.
-
-
-
The LCD has now been fully disconnected from the casing and can be repaired/replaced!
-


To reassemble your device, follow these instructions in reverse order.
Cancelar: não concluí este guia.
30 outras pessoas executaram este guia.
Equipe

Cal Poly, Team 5-11, Maness Spring 2015 Membro de Cal Poly, Team 5-11, Maness Spring 2015
CPSU-MANESS-S15S5G11
4 Membros
Autoria de 20 guias
13Comentários do guia
Now I just need to find the affordable replacement LCD Panel. Mine is not too bad - but it has recently developed a streak on one side that is very irksome.
Love your site! Proved very helpful on multiple occasions and your products are fantastic!
Forgive my ignorance...
Is it possible to (1) Are any of the components of Thunderbolt Display upgrade-able? .... (2) There appears to be plenty of real-estate, can a Thunderbolt Display be turned into mac and/or pc? ... (3) Any way to upgrade to USB 3.0/3.1?...
I like tinkering with electronics and don't mind the complexities or if necessary getting parts, just wondering if any of these are possible and if so, can you give a clue as to where I can find more info... Thank You.
Would like to see a continuation of what it takes to replace the Thunderbolt cable that is attached to the back of the display
Hi Michael
What happen to your monitor for you to need to replace the cable. It could be solution as to why my monitor has a black screen.
Any help?
Thanks
Does the LCD from an iMac 2009 27” fit into the Thunderbolt Display and make it work?