Ir para o conteúdo principal

Apple TV 4th Generation Power Supply/Heatsink Replacement

O que você precisa

  1. Apple TV 4th Generation Power Supply/Heatsink Replacement, Logic Board: passo 1, imagem 1 %32 Apple TV 4th Generation Power Supply/Heatsink Replacement, Logic Board: passo 1, imagem 2 %32
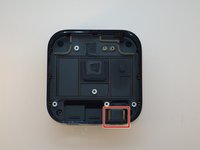
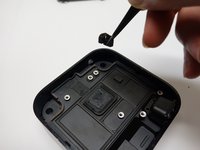
    • Remove the 4mm T7 Torx screw.

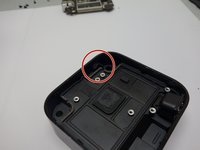
    • Remove the 5mm T7 Torx screw and its accompanying washer.

    • The silver screw is accompanied by a washer that is easily lost.

  2. Apple TV 4th Generation Power Supply/Heatsink Replacement: passo 2, imagem 1 %32 Apple TV 4th Generation Power Supply/Heatsink Replacement: passo 2, imagem 2 %32
    • Use the plastic opening tool to tip the board upward.

    • Avoid disturbing the square of gray thermal paste centered on top of the power supply/heatsink during removal.

  3. Apple TV 4th Generation Power Supply/Heatsink Replacement, Power Supply/Heatsink: passo 3, imagem 1 %32
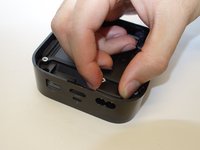
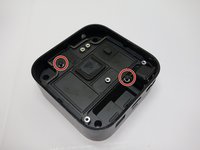
    • Remove the four (4) 4mm T7 Torx screws anchoring the power supply to the case.

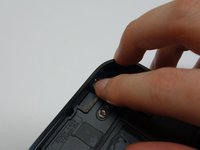
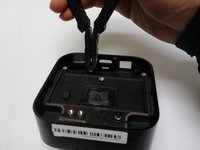
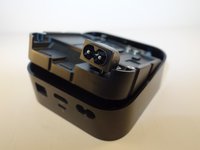
    • Remove the two (2) 4mm T6 Torx screws holding the power supply plug.

    • Avoid disturbing the square of gray thermal paste centered on top of the power supply/heatsink.

  4. Apple TV 4th Generation Power Supply/Heatsink Replacement: passo 4, imagem 1 %32 Apple TV 4th Generation Power Supply/Heatsink Replacement: passo 4, imagem 2 %32
    • Pull the power port away from the side of the casing.

  5. Apple TV 4th Generation Power Supply/Heatsink Replacement: passo 5, imagem 1 %32 Apple TV 4th Generation Power Supply/Heatsink Replacement: passo 5, imagem 2 %32
    • Dislodge the rubber power indicator light cowling's adhesive with a fingernail.

  6. Apple TV 4th Generation Power Supply/Heatsink Replacement: passo 6, imagem 1 %32 Apple TV 4th Generation Power Supply/Heatsink Replacement: passo 6, imagem 2 %32
    • Extract the rubber power indicator light cowling with tweezers by first pulling the cowling directly away from the case wall, until it clears the clear plastic nub of the diffuser, and then upwards.

    • The adhesive will still be sticky for reassembly.

  7. Apple TV 4th Generation Power Supply/Heatsink Replacement: passo 7, imagem 1 %32 Apple TV 4th Generation Power Supply/Heatsink Replacement: passo 7, imagem 2 %32 Apple TV 4th Generation Power Supply/Heatsink Replacement: passo 7, imagem 3 %32
    • Insert two of your 7mm T7 Torx screws into the indicated posts on the power supply/heatsink.

    • Using screw removal pliers, pull up on the screws, alternating between them, until the unit is free from the case.

    • The fit between the case and the power supply/heatsink is very tight. However, the power supply should fall freely into place on reassembly.

Conclusão

To reassemble your device, follow these instructions in reverse order.

7 outras pessoas executaram este guia.

Lisa Kelley

Membro desde: 10/26/17

371 Reputação

Autoria de 2 guias

Equipe

5 comentários

Where could one find such a power supply for the 4th generation Apple TV. Sadly this one went out without even a years worth of light use.

Lewis Gast - Responder

Lewis,

If its under a year just have apple replace it. I just replaced the powersupply with one I aquired on ebay. It didn’t power on when I was done with the fix. I didn’t go all inspector gadget on it, but with the plethora of heatsinks on this thing I bet some circuitry fried due to a heat issue.

gregkutzbach -

Found a replacement power supply on eBay- started working great. Hope it stays that way.

RRS - Responder

This instructions were perfect. Found power supply, replaced in about 15mins. Apple TV powers up again. Saved me from buying another.

THANK YOU

New Power Supply Board PA-1110-7A1 for Apple TV 4th Generation A1625by WFLNHBLearn more: https://www.amazon.com/dp/B07R4LBZ16/ref...

joseediaz1978 - Responder

What value fuse is used in Apple tv 4th gen power supply ?

charifctm - Responder

Adicione um comentário

Exibir estatísticas:

Últimas 24 horas: 1

Últimos 7 dias: 13

Últimos 30 dias: 55

Duração total: 8,400