Ir para o conteúdo principal

Andis Master Clippers Motor/Coil Assembly Replacement

O que você precisa

  1. Andis Master Clippers Motor/Coil Assembly Replacement, Motor/Coil Assembly: passo 1, imagem 1 %32 Andis Master Clippers Motor/Coil Assembly Replacement, Motor/Coil Assembly: passo 1, imagem 2 %32 Andis Master Clippers Motor/Coil Assembly Replacement, Motor/Coil Assembly: passo 1, imagem 3 %32
    • Caution: Make sure the clippers are unplugged from any electrical outlets before beginning teardown.

    • Using the Philips screwdriver, unscrew the two housing cover screws indicated.

    • using the Philips screwdriver, unscrew the two mounting screws indicated, holding down the Coil Assembly.

    • Reminder: keep track of appropriate washers with each screw

    • Using the Philips screwdriver, remove the switch installment screw indicated.

  2. Andis Master Clippers Motor/Coil Assembly Replacement: passo 2, imagem 1 %32 Andis Master Clippers Motor/Coil Assembly Replacement: passo 2, imagem 2 %32 Andis Master Clippers Motor/Coil Assembly Replacement: passo 2, imagem 3 %32
    • Lift the switch assembly up to loosen the actuating arm.

    • Pull switch button away from actuating arm. Then unclip the actuating arm from the switch assembly.

    • Locate the switch insulation underneath the switch assembly.

    • Note: The switch insulation is fragile and thin. Be careful not to damage it.

  3. Andis Master Clippers Motor/Coil Assembly Replacement: passo 3, imagem 1 %32 Andis Master Clippers Motor/Coil Assembly Replacement: passo 3, imagem 2 %32
    • Remove stud screw holding down the armature link (the piece on top the wires leading to the Coil Assembly).

    • Reminder: It may take extra force to unscrew this screw out due to the inner parts

    • Locate the Coil Assembly and the power wires leading to the Attached Power cord.

  4. Andis Master Clippers Motor/Coil Assembly Replacement: passo 4, imagem 1 %32 Andis Master Clippers Motor/Coil Assembly Replacement: passo 4, imagem 2 %32
    • Using the wire stripper, strip the ends of each wire approximately 1-2 cm to reveal enough wire to twist back together with new motor's wires.

    • Next, using the wire cutter, cut the {Positive & Negative} wires that are heading from the Coil Assembly to the Attached power cord. Cut approximately half way between the two ends of both wires.

    • Reminder: Be sure to keep track of the corresponding wires and their locations to match when you insert the new motor.

    • After you cut the old Coil Assembly's wires, remove it completely, and replace it with new one.

  5. Andis Master Clippers Motor/Coil Assembly Replacement: passo 5, imagem 1 %32 Andis Master Clippers Motor/Coil Assembly Replacement: passo 5, imagem 2 %32
    • Note: Black being {Negative} goes with the Black wire, Red being {Positive} goes with red wire. However, in this case the red wire goes with the white wire (it all depends on how the manufacturer ships it). The white wire extends from the Attached power cord

    • Twist the red wire that is coming from the Coil Assembly with the white one, and the black wire with the black one.

    • CAUTION: Match the wires correctly, Black with Black, and Red with White. If you matched the wrong wire, it will cause the clippers to have a short circuit (electrical malfunction) when you plug the electrical cord into an outlet.

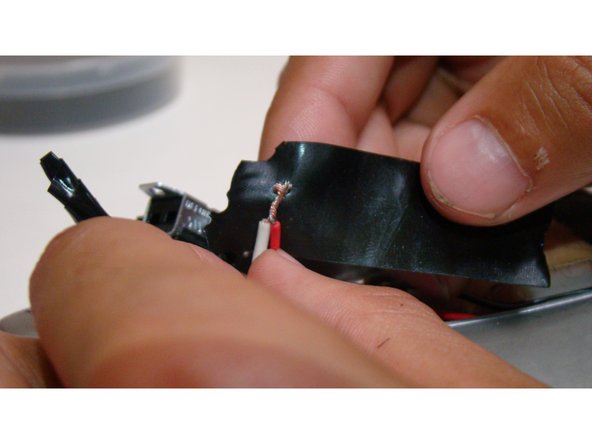
    • After you have twisted the wires together, use electrical tape to wrap the stripped wires. Leave some tape over the ends of the wires, and below the cutoff of the rubber around the wire as shown in the photo. Wrap the tape around the wires as tight as possible.

    • To complete this repair and reassembly, follow these steps in reverse, starting from the end of step 3 up to the beginning of step 1

Conclusão

To reassemble your device, follow these instructions in reverse order.

Uma outra pessoa concluiu este guia.

Marcus Thomas

Membro desde: 09/11/15

155 Reputação

Autoria de 1 guia

Equipe

4 comentários

I pulled red wire from coil.how can i put it back on?

John - Responder

Before I read this, i took out the side tension screw. Is there any info on screw & washer placement also?

Dan Pech - Responder

Anybody have any information on this at all???

Dan Pech - Responder

does anyone know the ohms of that coil

farmish - Responder

Adicione um comentário

Exibir estatísticas:

Últimas 24 horas: 1

Últimos 7 dias: 8

Últimos 30 dias: 35

Duração total: 7,920