Ir para o conteúdo principal

Acer Iconia A1-830 Front Facing Camera Replacement

O que você precisa

  1. Acer Iconia A1-830 Front Facing Camera Replacement, Disassembling Acer Iconia A1-830 Back Panel: passo 1, imagem 1 %32 Acer Iconia A1-830 Front Facing Camera Replacement, Disassembling Acer Iconia A1-830 Back Panel: passo 1, imagem 2 %32
    • Prepare your working space. The ideal work space has a flat, level surface that is clean and well lit.

    • Shut down your Acer Iconia A1-830.

    • Remove any cables or exterior covers from your tablet.

    • Place it on your work space, with the screen facing up.

  2. Acer Iconia A1-830 Front Facing Camera Replacement: passo 2, imagem 1 %32 Acer Iconia A1-830 Front Facing Camera Replacement: passo 2, imagem 2 %32
    • Wedge the plastic opening tool into the tiny gap between the white plastic front bezel and the aluminum rear panel.

    • Do not try to pry apart the top edge on the front side near the front-facing camera.

  3. Acer Iconia A1-830 Front Facing Camera Replacement, Battery: passo 3, imagem 1 %32 Acer Iconia A1-830 Front Facing Camera Replacement, Battery: passo 3, imagem 2 %32
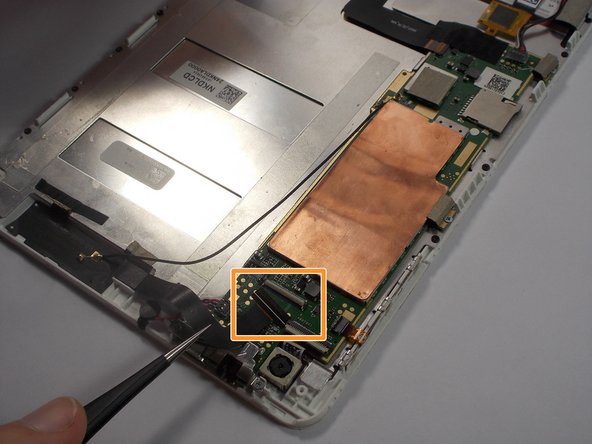
    • Remove the small clear plastic cover on top of the battery cable with the nylon or metal spudger.

  4. Acer Iconia A1-830 Front Facing Camera Replacement: passo 4, imagem 1 %32
    • Remove the battery cable by lifting it up with the pointy end of the black nylon spudger.

  5. Acer Iconia A1-830 Front Facing Camera Replacement: passo 5, imagem 1 %32 Acer Iconia A1-830 Front Facing Camera Replacement: passo 5, imagem 2 %32
    • Un-stick the battery from the metal plate using the black nylon spudger.

    • Be careful not to puncture the battery while removing it.

  6. Acer Iconia A1-830 Front Facing Camera Replacement, Front Facing Camera: passo 6, imagem 1 %32
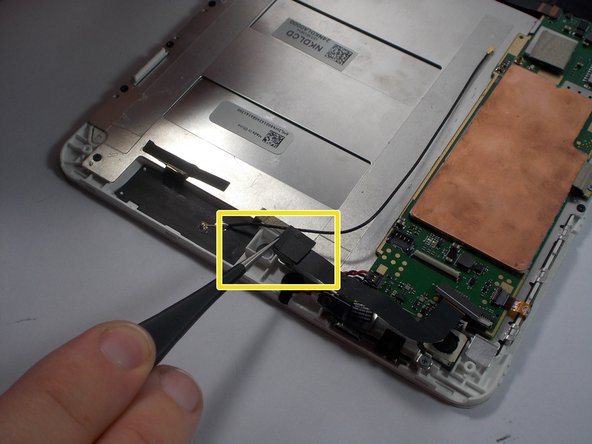
    • Peel off the piece of black tape covering the front facing camera ribbon cable.

    • Do this by holding down the ribbon cable and peeling off the tape with the metal tweezers.

  7. Acer Iconia A1-830 Front Facing Camera Replacement: passo 7, imagem 1 %32
    • Peel off the piece of black tape covering the front facing camera ribbon cable connector.

  8. Acer Iconia A1-830 Front Facing Camera Replacement: passo 8, imagem 1 %32 Acer Iconia A1-830 Front Facing Camera Replacement: passo 8, imagem 2 %32 Acer Iconia A1-830 Front Facing Camera Replacement: passo 8, imagem 3 %32
    • Lift up the small white lever to release the ribbon cable.

    • Pull out the ribbon cable from the connector with the metal tweezers.

    • Lift out the front facing camera from the plastic frame.

Conclusão

To reassemble your device, follow these instructions in reverse order.

Brendan Coveney

Membro desde: 10/18/15

593 Reputação

Autoria de 3 guias

Equipe

UMass Dartmouth, Team 4-6, Catania Fall 2015 Membro de UMass Dartmouth, Team 4-6, Catania Fall 2015

UMASSD-CATANIA-F15S4G6

Membros da 3

Autoria de 5 guias

0 comentários

Adicione um comentário

Exibir estatísticas:

Últimas 24 horas: 0

Últimos 7 dias: 1

Últimos 30 dias: 2

Duração total: 602