Esta versão pode conter edições incorretas. Mude para o último instantâneo verificado.
O que você precisa
-
Este passo não foi traduzido. Ajude a traduzi-lo
-
Use the pointed end of the spudger to slide the battery lock until the battery pops loose.
-
-
Este passo não foi traduzido. Ajude a traduzi-lo
-
Remove the two 6mm PH1 screws from the bottom of the laptop.
-
-
Este passo não foi traduzido. Ajude a traduzi-lo
-
Use the spudger, push the two tabs, located in the battery slot, through their slots to release the keyboard.
-
Do this with the computer slightly open for ease.
-
-
Este passo não foi traduzido. Ajude a traduzi-lo
-
Open the laptop.
-
Start top of the keyboard and use the opening tool to pop the remaining tabs around the keyboard loose.
-
The keyboard can be flipped onto its face once removed.
-
-
-
Este passo não foi traduzido. Ajude a traduzi-lo
-
Use the spudger and slide the grey tabs on either side of the keyboard wires away from the white plastic.
-
-
Este passo não foi traduzido. Ajude a traduzi-lo
-
Disconnect the keyboard by pulling the blue tape on the wire strip.
-
-
Este passo não foi traduzido. Ajude a traduzi-lo
-
Remove the five 6mm PH1 screws beneath the keyboard.
-
-
Este passo não foi traduzido. Ajude a traduzi-lo
-
Use the spudger to pop the gray tab up and away from the far left wire strip.
-
Disconnect the wire strip by pulling the blue tab loose.
-
-
Este passo não foi traduzido. Ajude a traduzi-lo
-
Use the spudger to pop the white tab up away from the wire strip located at the top left corner of the mouse pad.
-
Disconnect the wire strip by pulling the blue tab.
-
-
Este passo não foi traduzido. Ajude a traduzi-lo
-
Close the laptop.
-
Remove the remaining 18 6mm PH1 screws from the bottom cover of the laptop.
-
-
Este passo não foi traduzido. Ajude a traduzi-lo
-
Use the opening tool to separate the back of the laptop from the inside cover.
-
Open the computer and remove the inside cover.
-
-
Este passo não foi traduzido. Ajude a traduzi-lo
-
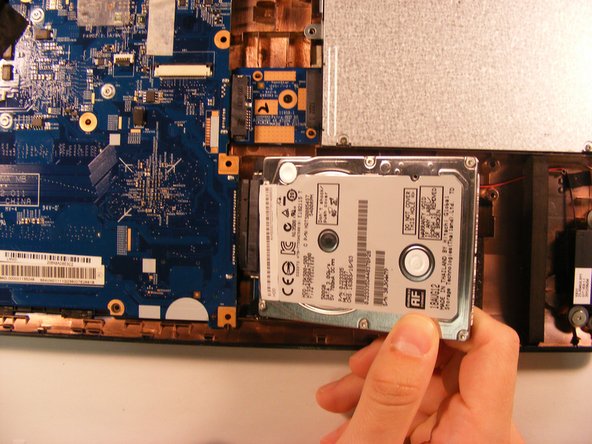
Lift the HDD out of the base and use the opening tool to disconnect the HDD from the motherboard wire.
-


Cancelar: não concluí este guia.
Uma outra pessoa concluiu este guia.
Equipe

University of Alabama, Team S2-G7, Bedsole Spring 2018 Membro de University of Alabama, Team S2-G7, Bedsole Spring 2018
UA-BEDSOLE-S18S2G7
Membros da 3
Autoria de 12 guias