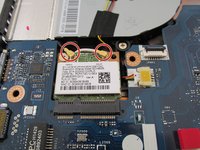
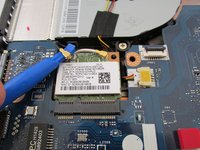
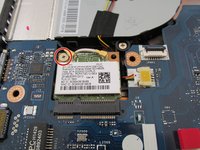
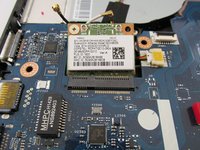
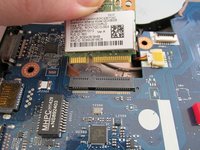
Ir para o conteúdo principal

Acer Aspire E5-571 WiFi Replacement

O que você precisa

  1. Acer Aspire E5-571 WiFi Replacement, Battery: passo 1, imagem 1 %32
    • Make sure the laptop is shut down.

    • Flip the laptop upside down. Rotate it so the battery faces you.

  2. Acer Aspire E5-571 WiFi Replacement: passo 2, imagem 1 %32
    • Place the pointed end of a spudger into the battery lock. Slide the battery lock to the left using the spudger. A "click" sound will accompany the release of the battery.

  3. Acer Aspire E5-571 WiFi Replacement: passo 3, imagem 1 %32
    • Pull the battery towards you to remove it from the laptop.

  4. Acer Aspire E5-571 WiFi Replacement, Keyboard: passo 4, imagem 1 %32
    • Remove all eighteen 8 mm screws with a Phillips #0 screwdriver.

  5. Acer Aspire E5-571 WiFi Replacement: passo 5, imagem 1 %32 Acer Aspire E5-571 WiFi Replacement: passo 5, imagem 2 %32 Acer Aspire E5-571 WiFi Replacement: passo 5, imagem 3 %32
    • Carefully pry apart the clips holding the keyboard in place by moving a metal spudger along the seam.

    • Be careful not to break the plastic clips. Do not remove the keyboard until told to do so.

  6. Acer Aspire E5-571 WiFi Replacement: passo 6, imagem 1 %32 Acer Aspire E5-571 WiFi Replacement: passo 6, imagem 2 %32
    • Carefully flip up the white hinge. Then, detach the three ZIF ribbons connected to the motherboard.

    • Remove the panel with the keyboard and the touchpad.

  7. Acer Aspire E5-571 WiFi Replacement, WiFi: passo 7, imagem 1 %32
    • Locate the WiFi card on the motherboard.

  8. Acer Aspire E5-571 WiFi Replacement: passo 8, imagem 1 %32 Acer Aspire E5-571 WiFi Replacement: passo 8, imagem 2 %32
    • Locate the two antenna cables shown.

    • Using a plastic opening tool, remove both antenna cables from the WiFi card by gently prying them up.

    • Black on left. White on right.

  9. Acer Aspire E5-571 WiFi Replacement: passo 9, imagem 1 %32 Acer Aspire E5-571 WiFi Replacement: passo 9, imagem 2 %32 Acer Aspire E5-571 WiFi Replacement: passo 9, imagem 3 %32
    • Remove this 3 mm Phillips #0 screw and the WiFi card should pop up.

    • Make sure antenna cables are removed before removing the screw.

    • Gently lift WiFi card off of the motherboard.

Conclusão

To reassemble your device, follow these instructions in reverse order.

9 outras pessoas executaram este guia.

daniel sawyer

Membro desde: 08/23/15

2.566 Reputação

Autoria de 5 guias

Equipe

USF Tampa, Team 4-2, Meier Fall 2015 Membro de USF Tampa, Team 4-2, Meier Fall 2015

USFT-MEIER-F15S4G2

Membros da 3

Autoria de 5 guias

7 comentários

Very well done - thank you!

glgsolutions - Responder

np. im glad it worked for you. could you post the exact model you have and was there anything I missed?

daniel sawyer -

Great guide. I would just like to mention a difference I found. My laptop had white connectors and the hinged lock latch was black. So I guess all assemblies aren’t identical. Also, the large connector for the keyboard did not have a locking latch. My model is an E5-571P manufactured 2014/09/15.

Dan O - Responder

Hi, I want faster Wifi. Which Wifi card do I need to replace for a Acer Aspire e15 e5-571-58E6?

Patrizia Barberio - Responder

Hi I just bought an upgrade, so I’ll tell you which one I got and if it worked when I get it in the mail in a few weeks.

Matt -

Adicione um comentário

Exibir estatísticas:

Últimas 24 horas: 1

Últimos 7 dias: 9

Últimos 30 dias: 24

Duração total: 7,523