Ir para o conteúdo principal

Acer Aspire 7736Z-4809 Hard Drive Replacement

O que você precisa

  1. Acer Aspire 7736Z-4809 Hard Drive Replacement, Acer Aspire 7736Z-4809 Repair Preparation: passo 1, imagem 1 %32
    • Unplug and power off the laptop.

    • If the battery is still connected to the laptop, remove the battery.

  2. Acer Aspire 7736Z-4809 Hard Drive Replacement: passo 2, imagem 1 %32
    • Flip over the laptop so that the back panel of the laptop is facing up.

  3. Acer Aspire 7736Z-4809 Hard Drive Replacement, Back Panel: passo 3, imagem 1 %32 Acer Aspire 7736Z-4809 Hard Drive Replacement, Back Panel: passo 3, imagem 2 %32
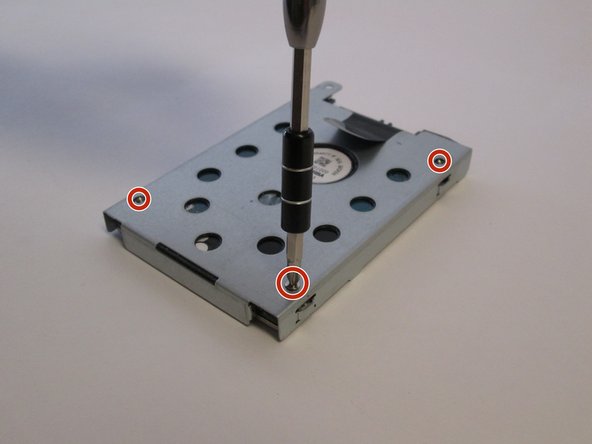
    • Use the Phillips #1 screwdriver to remove the eight 6.5 mm Phillips #1 screws.

    • Only the four screws in the center are removable, the four along the edges are held in by rivets but can be loosened.

  4. Acer Aspire 7736Z-4809 Hard Drive Replacement: passo 4, imagem 1 %32 Acer Aspire 7736Z-4809 Hard Drive Replacement: passo 4, imagem 2 %32 Acer Aspire 7736Z-4809 Hard Drive Replacement: passo 4, imagem 3 %32
    • Remove the back panel of the laptop.

  5. Acer Aspire 7736Z-4809 Hard Drive Replacement: passo 5, imagem 1 %32
    • Connect a grounding cord to a metal interface on the laptop.

    • Ground the laptop to prevent static electricity from damaging the electrical components inside the laptop.

  6. Acer Aspire 7736Z-4809 Hard Drive Replacement, Hard Drive: passo 6, imagem 1 %32 Acer Aspire 7736Z-4809 Hard Drive Replacement, Hard Drive: passo 6, imagem 2 %32
    • Use the Phillips #1 screwdriver to remove the 3.5mm Phillips #1 screw.

  7. Acer Aspire 7736Z-4809 Hard Drive Replacement: passo 7, imagem 1 %32 Acer Aspire 7736Z-4809 Hard Drive Replacement: passo 7, imagem 2 %32
    • Slide the bracket towards you to release it from the frame.

  8. Acer Aspire 7736Z-4809 Hard Drive Replacement: passo 8, imagem 1 %32 Acer Aspire 7736Z-4809 Hard Drive Replacement: passo 8, imagem 2 %32 Acer Aspire 7736Z-4809 Hard Drive Replacement: passo 8, imagem 3 %32
    • Use the black tab to pull the hard drive up and out of the laptop.

  9. Acer Aspire 7736Z-4809 Hard Drive Replacement: passo 9, imagem 1 %32 Acer Aspire 7736Z-4809 Hard Drive Replacement: passo 9, imagem 2 %32
    • Use the Phillips #1 screwdriver to remove the four 3.5 Phillips #1 screws.

  10. Acer Aspire 7736Z-4809 Hard Drive Replacement: passo 10, imagem 1 %32
    • Remove the hard drive from the bracket and install the new hard drive.

Conclusão

To reassemble your device, follow these instructions in reverse order.

Uma outra pessoa concluiu este guia.

Equipe

UC Davis, Team 2-4, Oliver Fall 2016 Membro de UC Davis, Team 2-4, Oliver Fall 2016

UCD-OLIVER-F16S2G4

Membros da 5

Autoria de 10 guias

0 comentários

Adicione um comentário

Exibir estatísticas:

Últimas 24 horas: 0

Últimos 7 dias: 4

Últimos 30 dias: 12

Duração total: 1,067