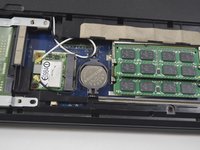
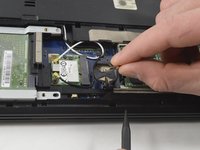
Ir para o conteúdo principal

Acer Aspire 5742 CMOS Battery Replacement

O que você precisa

  1. Acer Aspire 5742 CMOS Battery Replacement, Battery: passo 1, imagem 1 %32 Acer Aspire 5742 CMOS Battery Replacement, Battery: passo 1, imagem 2 %32 Acer Aspire 5742 CMOS Battery Replacement, Battery: passo 1, imagem 3 %32
    • Move the battery catch to the "unlocked" position.

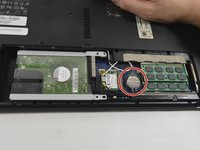
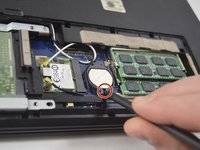
    • Pull back the second spring-loaded battery catch until the battery pops up.
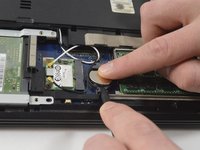
    • Remove the battery.

  2. Acer Aspire 5742 CMOS Battery Replacement, Cover Panel: passo 2, imagem 1 %32 Acer Aspire 5742 CMOS Battery Replacement, Cover Panel: passo 2, imagem 2 %32 Acer Aspire 5742 CMOS Battery Replacement, Cover Panel: passo 2, imagem 3 %32
    • Turn the notebook around to face you.

    • There are two Phillips #00 screws securing the cover panel to the rest of the notebook. Remove these screws.

  3. Acer Aspire 5742 CMOS Battery Replacement: passo 3, imagem 1 %32 Acer Aspire 5742 CMOS Battery Replacement: passo 3, imagem 2 %32 Acer Aspire 5742 CMOS Battery Replacement: passo 3, imagem 3 %32
    • Use a spudger to release the panel from the plastic retaining clips keeping it in place.

    • Do not apply too much force, or you may break the clips.

    • Remove the panel and set it aside.

  4. Acer Aspire 5742 CMOS Battery Replacement, CMOS Battery: passo 4, imagem 1 %32 Acer Aspire 5742 CMOS Battery Replacement, CMOS Battery: passo 4, imagem 2 %32
    • After removing the cover panel, you will see the hard drive, the RAM, and the CMOS battery.

    • The CMOS battery is the silver coin-like object in the center.

  5. Acer Aspire 5742 CMOS Battery Replacement: passo 5, imagem 1 %32 Acer Aspire 5742 CMOS Battery Replacement: passo 5, imagem 2 %32 Acer Aspire 5742 CMOS Battery Replacement: passo 5, imagem 3 %32
    • Press the tip of the spudger underneath the CMOS battery with very slight force.

    • Press down on the opposite side of the battery while prying the battery upward with the spudger.

    • After the battery is mostly lifted from the slot, you may pull out the battery with your fingers.

Conclusão

To reassemble your device, follow these instructions in reverse order.

8 outras pessoas executaram este guia.

Bill Murray

Membro desde: 10/24/16

581 Reputação

Autoria de 2 guias

Equipe

UMass Dartmouth, Team 2-6, Isaacson Fall 2016 Membro de UMass Dartmouth, Team 2-6, Isaacson Fall 2016

UMASSD-ISAACSON-F16S2G6

Membros da 3

Autoria de 8 guias

Um comentário

Adicione um comentário

Exibir estatísticas:

Últimas 24 horas: 4

Últimos 7 dias: 23

Últimos 30 dias: 93

Duração total: 14,123