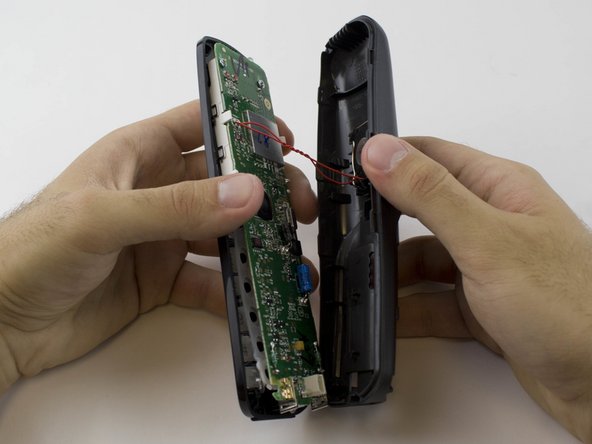
Ir para o conteúdo principal

ATT EL52300 Keypad/Plastic Display Screen Replacement

O que você precisa

  1. ATT EL52300 Keypad/Plastic Display Screen Replacement, Battery: passo 1, imagem 1 %32 ATT EL52300 Keypad/Plastic Display Screen Replacement, Battery: passo 1, imagem 2 %32
    • Find the bump where the battery cover meets the phone. Put your thumb here, and push and slide the cover down.

  2. ATT EL52300 Keypad/Plastic Display Screen Replacement: passo 2, imagem 1 %32
    • Unplug the battery by squeezing your hands on the small white plug and lifting it up.

    • Do not pull on the wire itself because you might damage the wire!

    • The battery is now detached and ready to be removed by lifting it out.

  3. ATT EL52300 Keypad/Plastic Display Screen Replacement, Motherboard: passo 3, imagem 1 %32 ATT EL52300 Keypad/Plastic Display Screen Replacement, Motherboard: passo 3, imagem 2 %32
    • Remove the two 3.75 mm screws with a PH1 screwdriver.

  4. ATT EL52300 Keypad/Plastic Display Screen Replacement: passo 4, imagem 1 %32 ATT EL52300 Keypad/Plastic Display Screen Replacement: passo 4, imagem 2 %32
    • Use a plastic opening tool to remove the handset case.

    • Be careful to not lift the case too far as the ringer cable is attached to the case.

  5. ATT EL52300 Keypad/Plastic Display Screen Replacement: passo 5, imagem 1 %32 ATT EL52300 Keypad/Plastic Display Screen Replacement: passo 5, imagem 2 %32
    Ferramenta utilizada nesse passo:
    Anti-Static Wrist Strap
    $7.95
    Comprar
    • Remove the two 3.65 mm screws on the motherboard with a PH1 screwdriver.

    • Use an anti-static wrist strap to prevent damage to the motherboard.

  6. ATT EL52300 Keypad/Plastic Display Screen Replacement, Keypad/Plastic Display Screen: passo 6, imagem 1 %32 ATT EL52300 Keypad/Plastic Display Screen Replacement, Keypad/Plastic Display Screen: passo 6, imagem 2 %32
    • The keypad lies on the top of the motherboard and is easily detachable.

    • Remove the keypad.

  7. ATT EL52300 Keypad/Plastic Display Screen Replacement: passo 7, imagem 1 %32
    • Replace the plastic display screen, or the keypad buttons as needed.

Conclusão

To reassemble your device, follow these instructions in reverse order.

Katty

Membro desde: 08/27/15

313 Reputação

Autoria de 3 guias

Equipe

USF Tampa, Team 1-1, Sullivan Spring 2016 Membro de USF Tampa, Team 1-1, Sullivan Spring 2016

USFT-SULLIVAN-S16S1G1

Membros da 4

Autoria de 10 guias

0 comentários

Adicione um comentário

Exibir estatísticas:

Últimas 24 horas: 0

Últimos 7 dias: 1

Últimos 30 dias: 2

Duração total: 493