Ir para o conteúdo principal

ASUS X502CA Wi-Fi Card Replacement

O que você precisa

  1. ASUS X502CA Wi-Fi Card Replacement, Palm Rest with Keyboard and Touch Pad: passo 1, imagem 1 %32
    • Use the Phillips #00 screwdriver to remove the seven 90mm screws.

    • Use the Phillips #00 screwdriver to remove the four 50mm screws.

  2. ASUS X502CA Wi-Fi Card Replacement: passo 2, imagem 1 %32
    • Next, use the plastic opening tool to carefully pop off the keyboard cover panel.

    • Be cautious when pulling off the cover because there are cables you will have to disconnect before completely removing the panel.

  3. ASUS X502CA Wi-Fi Card Replacement: passo 3, imagem 1 %32 ASUS X502CA Wi-Fi Card Replacement: passo 3, imagem 2 %32
    • Lift palm rest and unplug keyboard cable and touchpad cable using tweezers. After these two cables have been unplugged you can remove the keyboard cover panel.

  4. ASUS X502CA Wi-Fi Card Replacement: passo 4, imagem 1 %32 ASUS X502CA Wi-Fi Card Replacement: passo 4, imagem 2 %32
    • Lift Palm Rest away.

    • Replace with new palm rest.

  5. ASUS X502CA Wi-Fi Card Replacement, Hard Drive: passo 5, imagem 1 %32 ASUS X502CA Wi-Fi Card Replacement, Hard Drive: passo 5, imagem 2 %32
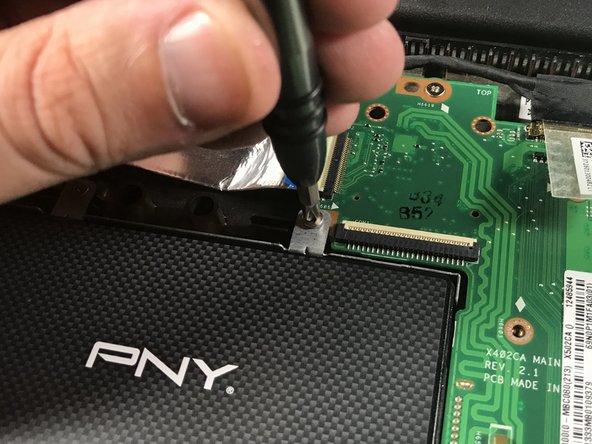
    • Remove the four 5mm screws that attach the hard drive bracket using the Phillips #0 screwdriver.

  6. ASUS X502CA Wi-Fi Card Replacement: passo 6, imagem 1 %32 ASUS X502CA Wi-Fi Card Replacement: passo 6, imagem 2 %32
    • Lift the hard drive and attached bracket up and out.

  7. ASUS X502CA Wi-Fi Card Replacement: passo 7, imagem 1 %32 ASUS X502CA Wi-Fi Card Replacement: passo 7, imagem 2 %32 ASUS X502CA Wi-Fi Card Replacement: passo 7, imagem 3 %32
    • Remove the four 5mm Phillips #0 screws attaching the bracket to the hard drive.

    • There are 2 screws on each side.

  8. ASUS X502CA Wi-Fi Card Replacement, LED Board: passo 8, imagem 1 %32 ASUS X502CA Wi-Fi Card Replacement, LED Board: passo 8, imagem 2 %32 ASUS X502CA Wi-Fi Card Replacement, LED Board: passo 8, imagem 3 %32
    • Use the plastic opening tool to flip up the small clamp and pull out the ribbon cable.

  9. ASUS X502CA Wi-Fi Card Replacement: passo 9, imagem 1 %32 ASUS X502CA Wi-Fi Card Replacement: passo 9, imagem 2 %32
    • Use 1 or 2 plastic opening tools to push down the small black plastic clips.

    • Pull the board up and out.

  10. ASUS X502CA Wi-Fi Card Replacement, Left I/O Board: passo 10, imagem 1 %32 ASUS X502CA Wi-Fi Card Replacement, Left I/O Board: passo 10, imagem 2 %32
    • Locate the I/O board on the left of the computer. Using the Phillips #0 screwdriver, unscrew the three 5mm screws to unhinge the screen, which will free the board allowing it to be removed and replaced.

    • Be careful with handling your computer while one side is unhinged; mishandling or over pressuring the other hinge could cause damage to it or the screen.

  11. ASUS X502CA Wi-Fi Card Replacement: passo 11, imagem 1 %32 ASUS X502CA Wi-Fi Card Replacement: passo 11, imagem 2 %32
    • Unplug the power strip connecting to the motherboard with your fingers or plastic opening tool.

    • Make sure the power strip is disconnected before pulling the board out.

  12. ASUS X502CA Wi-Fi Card Replacement: passo 12, imagem 1 %32 ASUS X502CA Wi-Fi Card Replacement: passo 12, imagem 2 %32
    • Slightly pull the unhinged screen up to free the board and remove it.

  13. ASUS X502CA Wi-Fi Card Replacement, Battery: passo 13, imagem 1 %32
    • Next, locate the battery in the front of laptop (closest to you).

  14. ASUS X502CA Wi-Fi Card Replacement: passo 14, imagem 1 %32
    • Unplug the battery from the laptop in the upper right hand corner of the battery using tweezers.

    • If battery is not unplugged, motherboard may shock you.

  15. ASUS X502CA Wi-Fi Card Replacement: passo 15, imagem 1 %32 ASUS X502CA Wi-Fi Card Replacement: passo 15, imagem 2 %32
    • Use the Phillips #00 Screwdriver to carefully remove the 6 screws holding the battery in place.

    • Once you have removed all six screws carefully lift the battery out and dispose.

    • Each screw is 50 mm in length and 15 mm in diameter.

  16. ASUS X502CA Wi-Fi Card Replacement, Motherboard: passo 16, imagem 1 %32 ASUS X502CA Wi-Fi Card Replacement, Motherboard: passo 16, imagem 2 %32
    • Use the Phillips #0 screwdriver to remove the last five 5mm screws holding the motherboard down.

    • These screws will be marked by diamonds next to the screw holes.

  17. ASUS X502CA Wi-Fi Card Replacement: passo 17, imagem 1 %32 ASUS X502CA Wi-Fi Card Replacement: passo 17, imagem 2 %32
    • Use the plastic opening tool to unclip the two wires from the Wi-Fi card that are connected to the motherboard.

  18. ASUS X502CA Wi-Fi Card Replacement: passo 18, imagem 1 %32 ASUS X502CA Wi-Fi Card Replacement: passo 18, imagem 2 %32 ASUS X502CA Wi-Fi Card Replacement: passo 18, imagem 3 %32
    • Flip the motherboard over and use the plastic opening tool to unplug the black and red wires from the motherboard.

  19. ASUS X502CA Wi-Fi Card Replacement: passo 19, imagem 1 %32
    • Pull up on the motherboard and take it out.

  20. ASUS X502CA Wi-Fi Card Replacement, Wi-Fi Card: passo 20, imagem 1 %32 ASUS X502CA Wi-Fi Card Replacement, Wi-Fi Card: passo 20, imagem 2 %32
    • Take out the 2.5mm PH #0 screw located on the top of the Wi-Fi card.

    • Lift the card up and pull it out.

Conclusão

To reassemble your device, follow these instructions in reverse order.

Christian Spencer

Membro desde: 11/06/18

436 Reputação

Autoria de 4 guias

Equipe

UMass Dartmouth, Team S5-G6, Gulbrandsen Fall 2018 Membro de UMass Dartmouth, Team S5-G6, Gulbrandsen Fall 2018

UMASSD-GULBRANDSEN-F18S5G6

Membros da 3

Autoria de 5 guias

Um comentário

Thank you

What type of card should we buy? We have to be ready with the replacement to start to take the parts out.

Can you post a picture of the card so we can see the slot and read what is written on it. I know you have 2 pictures but the red circle cover the writing.

Do you know the slot type of that card? Is it PCI-E slot ?

Do you know if that computer can accept 802.11ac or 802.11ax card ?

Can you post a link to the card that you used as replacement or another compatible card?

marcos - Responder

Adicione um comentário

Exibir estatísticas:

Últimas 24 horas: 0

Últimos 7 dias: 3

Últimos 30 dias: 10

Duração total: 646