Ir para o conteúdo principal

ASUS TUF Gaming FX505DY Wi-Fi Card Replacement

O que você precisa

  1. ASUS TUF Gaming FX505DY Wi-Fi Card Replacement, Back Case: passo 1, imagem 1 %32
    • Turn off the laptop.

    • Disconnect the charging cable.

    • Failure to disconnect the charging cable and power down the computer could result in personal or property damage.

    • Flip the laptop so the back is facing up.

  2. ASUS TUF Gaming FX505DY Wi-Fi Card Replacement: passo 2, imagem 1 %32 ASUS TUF Gaming FX505DY Wi-Fi Card Replacement: passo 2, imagem 2 %32
    • Use a Phillips #1 screwdriver to remove the five 6 mm screws that secure the back panel.

    • Use the same screwdriver to remove the six 13 mm screws securing the back panel.

  3. ASUS TUF Gaming FX505DY Wi-Fi Card Replacement: passo 3, imagem 1 %32 ASUS TUF Gaming FX505DY Wi-Fi Card Replacement: passo 3, imagem 2 %32
    • Insert the plastic opening tool at a corner and pry up along the edges, leaving the back side with the hinges for last.

    • Do not insert the opening tool too far into the laptop to avoid damaging internal components.

  4. ASUS TUF Gaming FX505DY Wi-Fi Card Replacement: passo 4, imagem 1 %32 ASUS TUF Gaming FX505DY Wi-Fi Card Replacement: passo 4, imagem 2 %32
    • Gently lift up the back panel to release any remaining clips on the side with the hinges and remove the panel.

  5. ASUS TUF Gaming FX505DY Wi-Fi Card Replacement, Solid State Drive: passo 5, imagem 1 %32 ASUS TUF Gaming FX505DY Wi-Fi Card Replacement, Solid State Drive: passo 5, imagem 2 %32
    • Remove the two 3 mm screws holding the solid state drive and its foil wrap in place using a Phillips #1 screwdriver.

    • The drive will pop up at an angle.

  6. ASUS TUF Gaming FX505DY Wi-Fi Card Replacement: passo 6, imagem 1 %32 ASUS TUF Gaming FX505DY Wi-Fi Card Replacement: passo 6, imagem 2 %32 ASUS TUF Gaming FX505DY Wi-Fi Card Replacement: passo 6, imagem 3 %32
    • Slide the foil wrap off of the drive.

  7. ASUS TUF Gaming FX505DY Wi-Fi Card Replacement: passo 7, imagem 1 %32 ASUS TUF Gaming FX505DY Wi-Fi Card Replacement: passo 7, imagem 2 %32
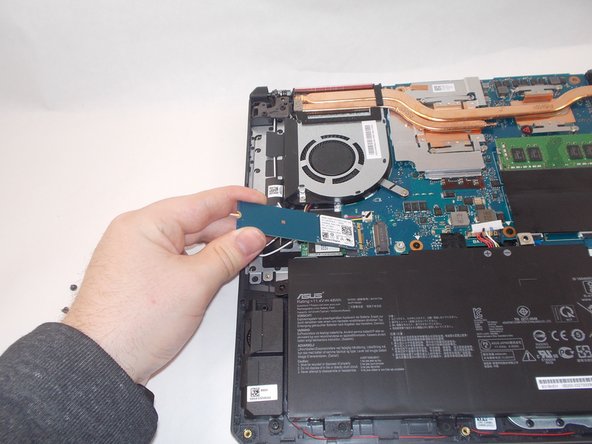
    • Remove the solid state drive by pulling it at an angle from the motherboard.

  8. ASUS TUF Gaming FX505DY Wi-Fi Card Replacement, Wi-Fi Card: passo 8, imagem 1 %32
    • Remove the tape covering the Wi-Fi card.

  9. ASUS TUF Gaming FX505DY Wi-Fi Card Replacement: passo 9, imagem 1 %32 ASUS TUF Gaming FX505DY Wi-Fi Card Replacement: passo 9, imagem 2 %32 ASUS TUF Gaming FX505DY Wi-Fi Card Replacement: passo 9, imagem 3 %32
    Ferramenta utilizada nesse passo:
    Tweezers
    $4.99
    Comprar
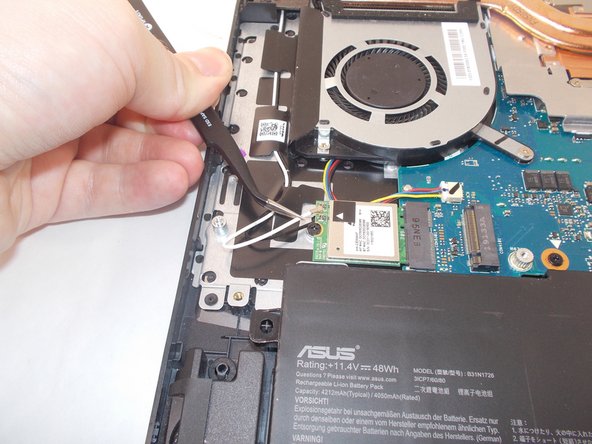
    • Using ESD-safe tweezers, remove the two coaxial antennas by lifting up on the wires near the connectors.

  10. ASUS TUF Gaming FX505DY Wi-Fi Card Replacement: passo 10, imagem 1 %32 ASUS TUF Gaming FX505DY Wi-Fi Card Replacement: passo 10, imagem 2 %32
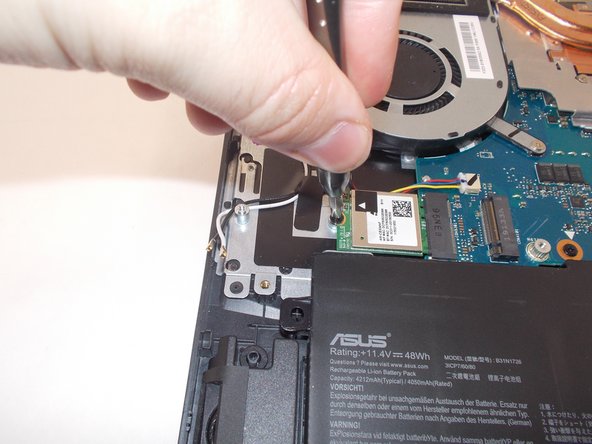
    • Remove the 6 mm screw using a Phillips #1 screwdriver.

  11. ASUS TUF Gaming FX505DY Wi-Fi Card Replacement: passo 11, imagem 1 %32 ASUS TUF Gaming FX505DY Wi-Fi Card Replacement: passo 11, imagem 2 %32
    • Remove the Wi-Fi card by pulling it straight away from its slot.

Conclusão

To reassemble your device, follow these instructions in reverse order.

3 outras pessoas executaram este guia.

Benyamin Claxton

Membro desde: 03/27/22

776 Reputação

Autoria de 5 guias

Equipe

UMass Dartmouth, Team 2-4, Mellen Spring 2022 Membro de UMass Dartmouth, Team 2-4, Mellen Spring 2022

UMASSD-MELLEN-S22S2G4

Membros da 4

Autoria de 8 guias

0 comentários

Adicione um comentário

Exibir estatísticas:

Últimas 24 horas: 12

Últimos 7 dias: 84

Últimos 30 dias: 358

Duração total: 9,506