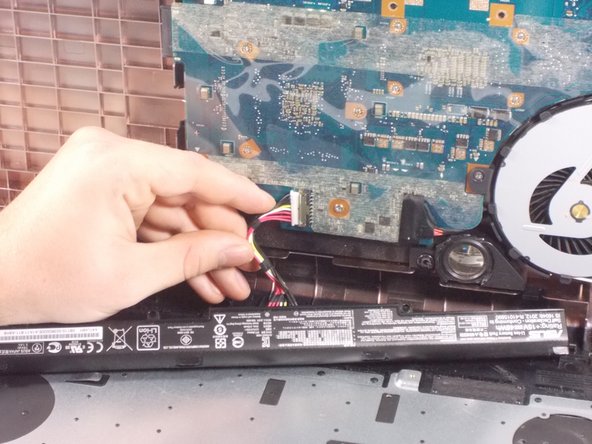
Ir para o conteúdo principal

ASUS GL752VW-DH74 Screen Replacement

O que você precisa

  1. ASUS GL752VW-DH74 Screen Replacement, Battery: passo 1, imagem 1 %32 ASUS GL752VW-DH74 Screen Replacement, Battery: passo 1, imagem 2 %32
    • Remove the 3 small screws located underneath the disk drive.

  2. ASUS GL752VW-DH74 Screen Replacement: passo 2, imagem 1 %32 ASUS GL752VW-DH74 Screen Replacement: passo 2, imagem 2 %32
    • Unscrew the nine remaining 8 mm Phillips-head screws on the back of the device.

  3. ASUS GL752VW-DH74 Screen Replacement: passo 3, imagem 1 %32 ASUS GL752VW-DH74 Screen Replacement: passo 3, imagem 2 %32
    • Use the opening tool to pry the back of the laptop case from the top

  4. ASUS GL752VW-DH74 Screen Replacement: passo 4, imagem 1 %32
    • Disconnect the 3 cables connecting the motherboard to the keyboard.

  5. ASUS GL752VW-DH74 Screen Replacement: passo 5, imagem 1 %32
    • Unscrew the two 8mm screws attached to the battery

  6. ASUS GL752VW-DH74 Screen Replacement: passo 6, imagem 1 %32
    • Disconnect the bundled cable connector and remove the battery.

  7. ASUS GL752VW-DH74 Screen Replacement, Screen: passo 7, imagem 1 %32 ASUS GL752VW-DH74 Screen Replacement, Screen: passo 7, imagem 2 %32
    • Follow the Battery Replacement Guide and remove the battery.

  8. ASUS GL752VW-DH74 Screen Replacement: passo 8, imagem 1 %32 ASUS GL752VW-DH74 Screen Replacement: passo 8, imagem 2 %32
    • Unhinge the two hinge covers on the back with a unhinging tool.

    • This is done to ensure the plastic hinge covers are not damaged.

  9. ASUS GL752VW-DH74 Screen Replacement: passo 9, imagem 1 %32 ASUS GL752VW-DH74 Screen Replacement: passo 9, imagem 2 %32
    • Remove the two tape covers and screws on the screen bezel.

  10. ASUS GL752VW-DH74 Screen Replacement: passo 10, imagem 1 %32 ASUS GL752VW-DH74 Screen Replacement: passo 10, imagem 2 %32
    • Use the metal spudger tool to pop out the screen bezel from all four sides.

  11. ASUS GL752VW-DH74 Screen Replacement: passo 11, imagem 1 %32
    • Remove the SATA cable attached to the screen.

  12. ASUS GL752VW-DH74 Screen Replacement: passo 12, imagem 1 %32 ASUS GL752VW-DH74 Screen Replacement: passo 12, imagem 2 %32
    • Unscrew the following screws and remove the screen from the casing.

Conclusão

To reassemble your device, follow these instructions in reverse order.

6 outras pessoas executaram este guia.

Maxwell Seibert

Membro desde: 10/27/17

885 Reputação

Autoria de 2 guias

Equipe

UMass Dartmouth, Team S1-G3, Isaacson Fall 2017 Membro de UMass Dartmouth, Team S1-G3, Isaacson Fall 2017

UMASSD-ISAACSON-F17S1G3

Membros da 3

Autoria de 5 guias

6 comentários

could you post how you removed the screen (srolled down to the bottom disappointed that it ended right there where I needed information on the cable connections to the back of the screen) Thanks

s ner - Responder

I’d like to as well

KasDing -

Followed your tutorial and replaced my laptop screen successfully, thanks!

Dan Thompson - Responder

3 stars at best. If I did not have any experience dealing with hardware replacement - and mine is only desktop - I would have been hard pressed to complete the screen replacement, if at all. I can't imagine a single person I know who had never kicked around on the internals of a computer that could have done this. You leave out incredibly important steps and kiddos to the few comments that corrected you on the screws that needed removal. You could have told us to remove the screen cable from the back of the screen and not the motherboard. You also assumed people had special tools at their disposal such as a hinge remover tool, or case separator tool. You should have advised people to take pictures before each step so that when reassembling they could refer to how it looked before they pulled this cable or that. All in all, thanks, but a sloppy job.

Steven Mather - Responder

EDIT: I see that you did list the told needed at the beginning so I have to retract that issue and can still only give you 3 stars. You make to many assumptions about the technical ability of the reader. Also, I may be wrong but I do not believe the screen cable is a SATA connection.

Also, tell people to take care in storing and organizing the different screws, where they came from, store separately, etc. For instance I took a unused plastic container for a variety of screws with different segments to hold various hardware of different types and labeled each as I removed them.

Steven Mather - Responder

Adicione um comentário

Exibir estatísticas:

Últimas 24 horas: 0

Últimos 7 dias: 5

Últimos 30 dias: 46

Duração total: 5,660