Introdução
This Guide will show you how to safely replace / upgrade your CPU and clean the cooler if you are keeping it, (which will depend on its condition and if it meets the heat dissipation requirements of the new processor!) In this case the AMD cooler was rated up to 125W TDP ( thermal design power)) and the replacement processor was rated at 125W TDP.
O que você precisa
-
-
Remove the case cover, clip the crocodile clip of the anti-static wrist band to an unpainted part of the metal case attach the the wristband on the other end of the cable to your wrist, left is best if you are right handed.
-
-
-
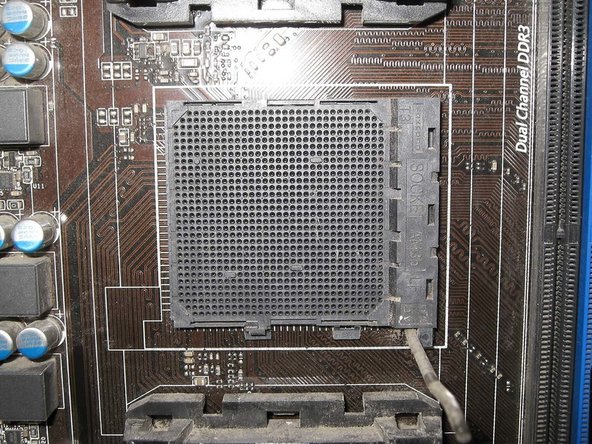
You will see the processor as shown. It is held in place to the AM3+ socket by two notches. On the left of the first picture you will see a leaver, pull this leave up till it faces the other way. This will un-tension the retaining mechanism allowing you to remove first one side from its notche the the other.
-
-
-
When your CPU is working under high load it will generate heat approaching it TDP. If the heatsink of the cooler is clog with dust and debis or the fan is not working well the CPU will over heat. You do not want this to happen!
-
As you can see a lot of dust had built up under the heatsink, even though the top had recently been cleaned!
-
How far you go in cleaning the heatsink is your decision. I removed the Fan assembly to clean it thoroughly.
-
The Fan assembly was held on with four plastic clips. very carefully use a flat blade screwdriver to pry the clip up a little and push the assembly up, repeat until the fan assembly comes off.
-
-
-
-
Use a paint brush, and Vacuum cleaner to remove all dust and debris from the Heatsink.
-
Clean the fan assembly with a disinfectant wipe(s) and then dry it with a lint free cloth.
-
Ensure you clean the base of the heatsink that will be in contact with the processor very well. There should be no remnants of the old heatsink compound.
-
-
-
Re-insert the metal plate you removed before vacuuming. Place it in the hole and push it down with the handle of a pair of pliers or something similar to prevent it falling sideways.
-
Re-insert the retaining mechanism, note the metal plate is to spread the force of the clamping mechanism
-
Carefully Clip the fan assembly back on top of the heatsink.
-
-
-
To remove the Fan just flex the retaining frame from the sides marked AVC and the fan will pup out!
-
I could not buy the original fan from the US so a substituted an HP Foxconn fan. the important thing is to get a high-speed fan of original power rating so 0.7a/700mA or higher. This fan spins at 6000rpm and seems to cool better but is loud! Gave up and put a Zalman CNPS9900 in cooler and quieter!!! *See Pic 3*
-
If you swap the fan use a hardware monitor program to check the CPU temperature to ensure the fan is cooling sufficiently: See step 9!
-
-
Ferramenta utilizada neste passo:Anti-Static Wrist Strap$7.95
-
To remove the processor on an AM3+ board gently push the leave on the socket way from under it's retaining clip and lift it up into a vertical position. If the machine is a tower chances are the processor will drop out.
-
Put the old processor into an anti-static container, Ensure your anti-static strap is connected. Remove the new processor from its anti-static container and gently place it in the socket. Both the processor and socket are marked as shown with a triangle to show the processor orientation.
-
-
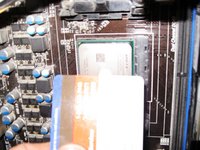
Ferramenta utilizada neste passo:Plastic Cards$2.99
-
Place a blob of Thermal paste to the processor and spread it with a plastic card or similar. The Thermal paste should be spread in a thin even layer. I placed the heat sink on the processor and moved it around a little to further even out the thermal compound.
-
-
-
Place the cooler on the CPU. Attach the bracket without the locking mechanism to its notch first then an attach the other side. Ensure both sides are attached, push the tension leaver into the locked position.
-


To reassemble your device, follow these instructions in reverse order.
To reassemble your device, follow these instructions in reverse order.
Cancelar: não concluí este guia.
3 outras pessoas executaram este guia.
