Ir para o conteúdo principal

3D Massage Mechanism Roller Arm Replacement

O que você precisa

  1. 3D  Massage Mechanism Roller Arm Replacement, Roller Arm: passo 1, imagem 1 %32
    • Before beginning be sure sure Mechanism is completely removed from the chair.

  2. 3D  Massage Mechanism Roller Arm Replacement: passo 2, imagem 1 %32 3D  Massage Mechanism Roller Arm Replacement: passo 2, imagem 2 %32 3D  Massage Mechanism Roller Arm Replacement: passo 2, imagem 3 %32
    • Remove the 2 Phillips head screws . This cover is located on the front of the mechanism.

    • Now spin the 3D motor belt .

    • By spinning this belt will move the 3D gears to the furthest position.

    • If you don't spin this motor the steps after this will not be possible to complete

  3. 3D  Massage Mechanism Roller Arm Replacement: passo 3, imagem 1 %32 3D  Massage Mechanism Roller Arm Replacement: passo 3, imagem 2 %32
    • Before beginning Roller Arm removal you will need to spin the kneading motor belt .

    • I always try to get the roller arms to a slightly closed position .

  4. 3D  Massage Mechanism Roller Arm Replacement: passo 4, imagem 1 %32 3D  Massage Mechanism Roller Arm Replacement: passo 4, imagem 2 %32
    • Remove the roller spring . You can use a pair of pliers.

    • Next we you need to remove the roller spring mount. this can be done by using an adjustable wrench .

  5. 3D  Massage Mechanism Roller Arm Replacement: passo 5, imagem 1 %32 3D  Massage Mechanism Roller Arm Replacement: passo 5, imagem 2 %32 3D  Massage Mechanism Roller Arm Replacement: passo 5, imagem 3 %32
    • Remove the upper Nut and washer .

    • Remove lower Teflon piece by removing all 3 screws.

    • In order to remove one of the three screws you will have to insert your screw driver behind the 3D motor Belt. Mind you this only applies to the LEFT side roller arm

  6. 3D  Massage Mechanism Roller Arm Replacement: passo 6, imagem 1 %32 3D  Massage Mechanism Roller Arm Replacement: passo 6, imagem 2 %32
    • Remove nut and washer.

    • lock the vice grips onto the kneading motor shaft. while using a wrench at the same time to loosen the nut.

    • PLEASE DO NOT OVER TIGHTEN THE VICE GRIPS. YOU COULD POTENTIALLY DAMAGE THE SHAFT.

  7. 3D  Massage Mechanism Roller Arm Replacement: passo 7, imagem 1 %32 3D  Massage Mechanism Roller Arm Replacement: passo 7, imagem 2 %32
    • Using the handle of a wrench or a small pry bar apply pressure between the roller arm and the assembly.

  8. 3D  Massage Mechanism Roller Arm Replacement: passo 8, imagem 1 %32 3D  Massage Mechanism Roller Arm Replacement: passo 8, imagem 2 %32
    • The roller arms have wires going to a sensor board on the back side of the mechanism. Remove this plastic mount mount.

    • This wire will plug into a small PCB on the back side of the mechanism . I don't have the PCB in this photo but once you follow the wire its self explanatory

  9. 3D  Massage Mechanism Roller Arm Replacement: passo 9, imagem 1 %32
    • Roller arm has been removed Successfully

  10. 3D  Massage Mechanism Roller Arm Replacement, Reassembly Tricks: passo 10, imagem 1 %32
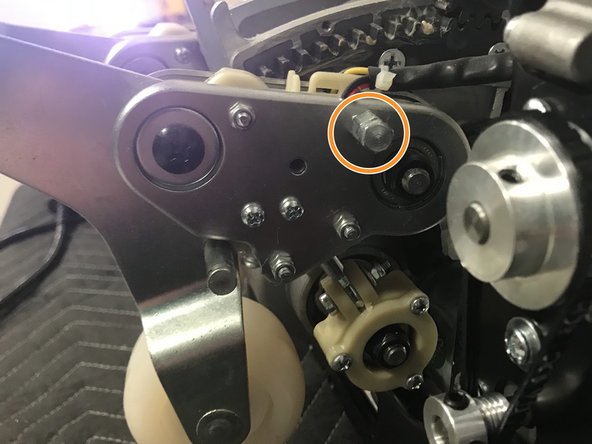
    • When reinstalling this outer nut cover it will appear like it doesn't fit . It needs to be attached by evenly screwing in the bolts at the same time. example: screw in one bolt half way, screw in the other 2 half way, repeat until secure.

    • Beware you may have difficulty removing roller arms from the shaft, i assure you it will come off. Sometimes its a matter of spinning the kneading motor until you have a enough space. See Step 3

    • Please note on your mechanism you may have to cut zip ties to free up the roller arm cable. please apply new zip ties as necessary.

Conclusão

To reassemble your device, follow these instructions in reverse order.

Nick

Membro desde: 05/30/17

2.737 Reputação

Autoria de 16 guias

0 comentários

Adicione um comentário

Exibir estatísticas:

Últimas 24 horas: 0

Últimos 7 dias: 3

Últimos 30 dias: 16

Duração total: 522