Ir para o conteúdo principal
Participe da comunidade de reparos - Criar conta

2011-2015 Kia Optima Brake Light Replacement

O que você precisa

  1. 2011-2015 Kia Optima Brake Light Replacement, Brake Light: passo 1, imagem 1 %32 2011-2015 Kia Optima Brake Light Replacement, Brake Light: passo 1, imagem 2 %32 2011-2015 Kia Optima Brake Light Replacement, Brake Light: passo 1, imagem 3 %32
    • Open the trunk and locate the tail light compartment behind the rear wheel well.

    • This guide will serve for both brake lights.

    Pergunte ao FixBot

    Comentar

  2. 2011-2015 Kia Optima Brake Light Replacement: passo 2, imagem 1 %32 2011-2015 Kia Optima Brake Light Replacement: passo 2, imagem 2 %32 2011-2015 Kia Optima Brake Light Replacement: passo 2, imagem 3 %32
    • Squeeze and pull back on the felt-like access panel to expose the tail light assembly.

    Pergunte ao FixBot

    Comentar

  3. 2011-2015 Kia Optima Brake Light Replacement: passo 3, imagem 1 %32 2011-2015 Kia Optima Brake Light Replacement: passo 3, imagem 2 %32 2011-2015 Kia Optima Brake Light Replacement: passo 3, imagem 3 %32
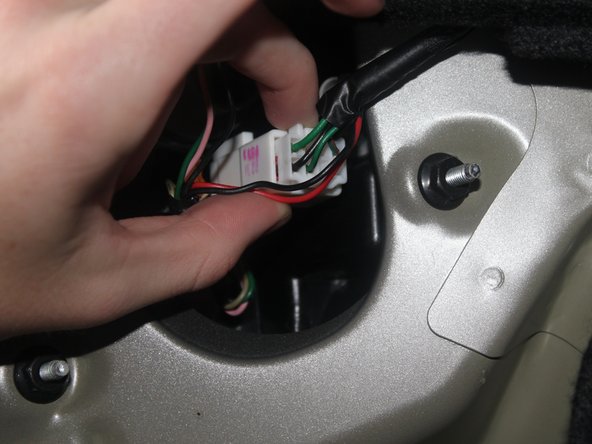
    • Squeeze down on the top tab of the battery connector. Then, pull the connector out.

    • Be sure to properly disconnect the battery to ensure safety when replacing the bulb.

    Pergunte ao FixBot

    Comentar

  4. 2011-2015 Kia Optima Brake Light Replacement: passo 4, imagem 1 %32 2011-2015 Kia Optima Brake Light Replacement: passo 4, imagem 2 %32 2011-2015 Kia Optima Brake Light Replacement: passo 4, imagem 3 %32
    • The grey brake light holder is connected to three wires. (Pink, Green, and Black as displayed)

    • Be sure not to pull on the three wires.

    • Twist the holder counter-clockwise using the two protruding tabs. Pull out the holder once unlocked.

    Pergunte ao FixBot

    Comentar

  5. 2011-2015 Kia Optima Brake Light Replacement: passo 5, imagem 1 %32 2011-2015 Kia Optima Brake Light Replacement: passo 5, imagem 2 %32
    • Twist the dead bulb counter clockwise to unlock it from the holder.

    • Be sure not to squeeze too hard on the light bulb as it may shatter or break.

    Pergunte ao FixBot

    Comentar

  6. 2011-2015 Kia Optima Brake Light Replacement: passo 6, imagem 1 %32 2011-2015 Kia Optima Brake Light Replacement: passo 6, imagem 2 %32
    • Be sure to place latex gloves on prior to opening and touching the new bulb.

    • Align the new bulb with the notch in the holder. Place bulb inside holder.

    • Gently push the bulb in and simultaneously twist clockwise to lock it into the holder.

    Pergunte ao FixBot

    Comentar

Conclusão

To reassemble your car, follow these instructions in reverse order.

Cancelar: não concluí este guia.

8 outras pessoas executaram este guia.

3Comentários do guia

Perfect instructions. Very easy and fast.

jamie swartz - Responder Compartilhar

Step 5: Twist the dead bulb counter clockwise to unlock it from the holder.

Is incorrect for at least the Canadian model of the Kia Optima. The brake light bulb on the drivers side needs to be pushed in and rotated ~30 degrees counter clockwise to be taken out of the grey bulb holder, I suspect the passenger side is the same.

Secondly for Canada, at least at Canadian Tire the bulb to buy is Sylvania LongLife bulb “2357”

kurt - Responder Compartilhar

I’m not in Canada so I don’t know the difference between Canadian and American but I had to push the bulb in and turn counter-clockwise to remove. But I did purchase both the Sylvania Longlife bulbs 1157A and 2357 but used 1157a.

Samantha Gibson - Responder Compartilhar

Comentar

Visualizações:

Últimas 24 horas: 5

Últimos 7 dias: 52

Últimos 30 dias: 188

Ao todo: 31,595