Esta versão pode conter edições incorretas. Mude para o último instantâneo verificado.
O que você precisa
-
Este passo não foi traduzido. Ajude a traduzi-lo
-
Locate the hood latch beside the driver's side door, next to the left foot rest.
-
Pull the latch toward you to release the hood.
-
-
Este passo não foi traduzido. Ajude a traduzi-lo
-
Walk around to the front of the vehicle.
-
Slide your hand under the hood, directly above the Honda emblem. Locate and pull the hood tab to unlock the hood.
-
Once the tab is released, lift the hood up.
-
-
Este passo não foi traduzido. Ajude a traduzi-lo
-
Use your left hand to hold the hood up. Locate the hood stand and pull it out of the clip.
-
Place the tip of the hood stand into the hole located in the upper left of the hood.
-
You can now let the hood rest on the stand.
-
-
Este passo não foi traduzido. Ajude a traduzi-lo
-
Place the hydraulic floor jack under the vehicle until the saddle is directly under the crossmember.
-
-
Este passo não foi traduzido. Ajude a traduzi-lo
-
Push downward on the jack's lever to lift the saddle upward so that it contacts the crossmember. Continue pushing downward on the lever to lift the car upward.
-
-
Este passo não foi traduzido. Ajude a traduzi-lo
-
Place the jack stand under the jack mounting point.
-
-
Este passo não foi traduzido. Ajude a traduzi-lo
-
Raise the jack stand until it contacts the jack mounting point.
-
-
-
Este passo não foi traduzido. Ajude a traduzi-lo
-
Remove the dipstick by lifting vertically.
-
Wipe all the oil off of the dipstick and put it back into the dipstick port.
-
-
Este passo não foi traduzido. Ajude a traduzi-lo
-
Remove the dipstick and examine the oil levels. The oil level should be between the two dots on the dipstick.
-
-
Este passo não foi traduzido. Ajude a traduzi-lo
-
Locate the oil fill cap on top of the engine and unscrew it.
-
-
Este passo não foi traduzido. Ajude a traduzi-lo
-
Crawl under the front of the car on your backside and identify the oil drain plug.
-
If there is any oil or residue around the drain plug, be sure to wipe it off before continuing.
-
-
Este passo não foi traduzido. Ajude a traduzi-lo
-
Place the oil drip pan under the drain plug and begin to loosen the drain plug with a 17mm wrench.
-
-
Este passo não foi traduzido. Ajude a traduzi-lo
-
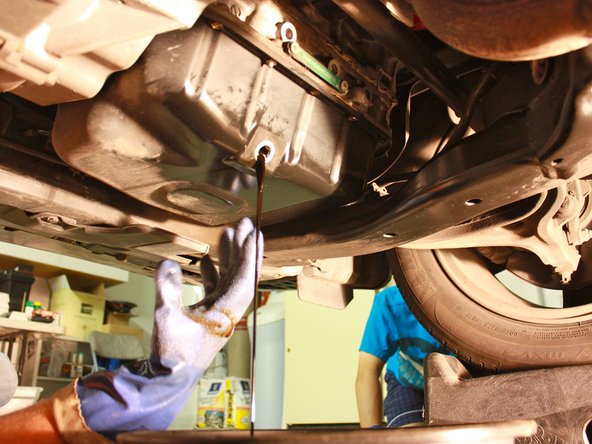
Loosen drain plug slowly by hand until the bolt is completely removed and oil begins to flow, re-positioning the oil drip pan if needed.
-
-
Este passo não foi traduzido. Ajude a traduzi-lo
-
Let the oil completely drain into the drip pan.
-
Put a new crush washer on the drain bolt, then reinstall the drain bolt.
-
Using a torque wrench, tighten it to:
-
33 lbf·ft (45 N·m , 4.6 kgf·m) for 4-cylinder models
-
or 29 lbf·ft (39 N·m , 4.0 kgf·m) for 6-cylinder models.
-
Set the drip pan aside.
-
-
Este passo não foi traduzido. Ajude a traduzi-lo
-
Identify the oil filter and place drip pan under the oil filter to catch falling oil.
-
Using a pair of channel locks, or flexible oil filter wrench (uses a strap to grip the filter), grip the oil filter tightly and twist counterclockwise to loosen.
-
-
Este passo não foi traduzido. Ajude a traduzi-lo
-
Slowly loosen the oil filter by hand until it is free.
-
-
Este passo não foi traduzido. Ajude a traduzi-lo
-
Drain the remaining oil in the filter by inverting it over the drip pan.
-
-
Este passo não foi traduzido. Ajude a traduzi-lo
-
Get the replacement filter and lightly spread clean engine oil onto the rubber gasket of the new filter.
-
-
Este passo não foi traduzido. Ajude a traduzi-lo
-
Thread the new filter into the oil filter port by turning the filter clockwise.
-
Once the rubber gasket contacts the engine block, hand-tighten the filter plus 1/4 turn.
-
-
Este passo não foi traduzido. Ajude a traduzi-lo
-
Using a funnel, pour 5 quarts of 5W-20 oil into the opening, making sure not to spill oil onto or around the engine.
-
Screw on and tighten the oil fill cap.
-


Cancelar: não concluí este guia.
28 outras pessoas executaram este guia.
Equipe

Cal Poly, Team 24-27, Regan Fall 2012 Membro de Cal Poly, Team 24-27, Regan Fall 2012
CPSU-REGAN-F12S24G27
Membros da 4
Autoria de 22 guias
25 comentários
You should do it while the engine is hot so the oil drains faster. Removing the the fill cap should be done before removing the drain plug. That will also help the oil drain faster and more completely. And 5 quarts is too much for that engine. It's more like 4.4 or 4.5 quarts. Over filling it is really bad. The counterweights on the crankshaft will splash in the oil creating a froth with air bubbles in it causing the oil to not lubricate the engine well which will wear out the engine faster
Yeah. What he said. Well maybe not a hot engine... But certainly not a cold one.
codeh d -
Can u pls help me for my accord problem
I just recently change my oil last 3 months and now the dipstick is showing no oil I had use castrol edge 5w-40 fully synthetic oil and now there is no oil can u pls help me
Don't change oil when really hot. You WILL burn yourself.