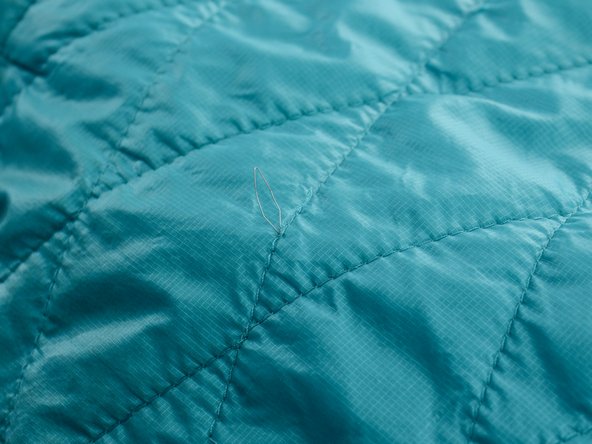
Ir para o conteúdo principal

パタゴニアのナノ・パフ・ジャケットの緩んだステッチの修理方法

O que você precisa

  1. パタゴニアのナノ・パフ・ジャケットの緩んだステッチの修理方法, パタゴニアのナノ・パフ・ジャケットの緩んだステッチの修理方法: passo 1, imagem 1 %32 パタゴニアのナノ・パフ・ジャケットの緩んだステッチの修理方法, パタゴニアのナノ・パフ・ジャケットの緩んだステッチの修理方法: passo 1, imagem 2 %32
    • 緩んだステッチが輪状かどうか確認します。

    • この手順はステッチが輪状の場合のみ有効です。ステッチが切れて緩んでいる場合はステッチ・リペア・ガイドを参照してください。

  2. パタゴニアのナノ・パフ・ジャケットの緩んだステッチの修理方法: passo 2, imagem 1 %32 パタゴニアのナノ・パフ・ジャケットの緩んだステッチの修理方法: passo 2, imagem 2 %32
    • 糸通しを用意します。

    • ダイアモンド形のワイヤーを備えた薄い金属製のものが最適です。

    • ジャケットを裏返しステッチの緩んだ輪の真裏を押さえます。

    • 糸通しのワイヤーを裏地から表地に差し込みます。

  3. パタゴニアのナノ・パフ・ジャケットの緩んだステッチの修理方法: passo 3, imagem 1 %32 パタゴニアのナノ・パフ・ジャケットの緩んだステッチの修理方法: passo 3, imagem 2 %32
    • ジャケットを表側に返します。

    • ステッチの緩んだ輪のできるだけ近くで糸通しのダイヤモンド形のワイヤーがジャケットから出ていることを確認します。

  4. パタゴニアのナノ・パフ・ジャケットの緩んだステッチの修理方法: passo 4, imagem 1 %32 パタゴニアのナノ・パフ・ジャケットの緩んだステッチの修理方法: passo 4, imagem 2 %32
    • 糸通しのダイアモンド形のワイヤーから緩んだ糸を慎重に引っ張ります。

    • 糸をワイヤーの最上部に滑らせます。

    • 糸はワイヤーの最上部に引っかかるはずです。引っかからない場合は、ワイヤーの最上部をゆっくりと占め糸を引っかけます。

  5. パタゴニアのナノ・パフ・ジャケットの緩んだステッチの修理方法: passo 5, imagem 1 %32 パタゴニアのナノ・パフ・ジャケットの緩んだステッチの修理方法: passo 5, imagem 2 %32 パタゴニアのナノ・パフ・ジャケットの緩んだステッチの修理方法: passo 5, imagem 3 %32
    • 糸通しをジャケットから抜きます。

    • 緩んだ糸はジャケットの裏地と表地の間に残り、どちら側からも見えないはずです。

    • 糸を裏地の外側に引っ張りだしてしまった場合は、糸が内側に隠れるまでジャケットの表地と裏地を引き離します。

Linha de Chegada

15 outras pessoas executaram este guia.

Um agradecimento especial a esses tradutores:

en jp

100%

Estes tradutores estão nos ajudando a consertar o mundo! Quer contribuir?
Comece a traduzir ›

Brittany McCrigler

Membro desde: 03/05/12

89.020 Reputação

Autoria de 131 guias

Equipe

iFixit Membro de iFixit

Staff

Membros da 135

Autoria de 17.257 guias

6 comentários

Thanks! This looks very helpful. Do you literally push the loop of the diamond wire through the jacket material? Do I need to make a hole with a needle?

It must work, but it seems that it would damage the jacket.

Scott - Responder

Works like a charm, would also work on sleeping bags etc. just repaired a down jacket and a nano puff shirt. Awesome

jennyburkinshaw - Responder

Where are you guys getting these wire threaders??? This method has only resulted in breaking two different threaders of mine, the fabric is too thick to get the wire through.

Camden Blizzard - Responder

If your needle threader is too weak, An alternative would be to insert a sewing needle through the fabric from front to back, leaving just the eye of the needle exposed. Thread the needle with the loop, as if you were threading the needle with a regular piece of thread, and pull the it through. This will be difficult to thread, because that loop is very short, but it is the only way I can think of if the “needle threader” is not strong enough to push through.

Linda Lesins - Responder

Addendum to last comment…. In the beginning, Insert the needle PARTIALLY through the fabric front to back before you thread it with the loop. That is the only way you will be able to get that short little loop thru the eye of the needle. It must be very close to the site that the needle it is entering the fabric for it to reach that eye! The smaller your fingers, the easier this will be !

Linda Lesins - Responder

Adicione um comentário

Exibir estatísticas:

Últimas 24 horas: 28

Últimos 7 dias: 193

Últimos 30 dias: 904

Duração total: 67,251