Ir para o conteúdo principal

パタゴニアのダウン・ジャケットのバッフルの修理方法

O que você precisa

Vídeo de Apresentação

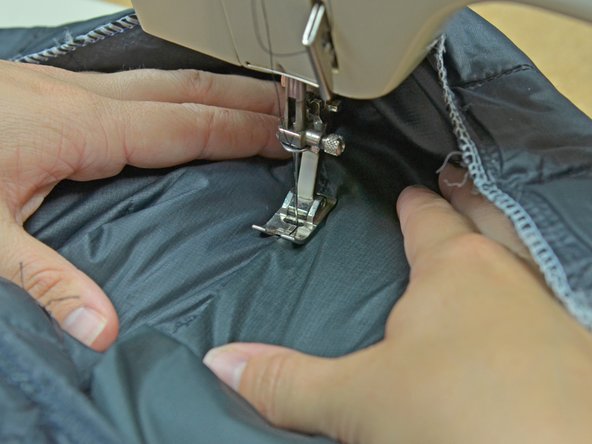
Down jacket baffle repair overview.

  1. パタゴニアのダウン・ジャケットのバッフルの修理方法, パタゴニアのダウン・ジャケットのバッフルの修理方法: passo 1, imagem 1 %32
    • ダウンジャケットの穴を確認します。ダウンが穴から出るのを防ぐためにバッフル全体を修理しなければなりません。

  2. パタゴニアのダウン・ジャケットのバッフルの修理方法: passo 2, imagem 1 %32 パタゴニアのダウン・ジャケットのバッフルの修理方法: passo 2, imagem 2 %32
    • 粘着性の補修テープを穴を覆う十分な大きさに切ります。

  3. パタゴニアのダウン・ジャケットのバッフルの修理方法: passo 3, imagem 1 %32 パタゴニアのダウン・ジャケットのバッフルの修理方法: passo 3, imagem 2 %32 パタゴニアのダウン・ジャケットのバッフルの修理方法: passo 3, imagem 3 %32
    • 補修テープを穴に貼ります。

  4. パタゴニアのダウン・ジャケットのバッフルの修理方法: passo 4, imagem 1 %32 パタゴニアのダウン・ジャケットのバッフルの修理方法: passo 4, imagem 2 %32 パタゴニアのダウン・ジャケットのバッフルの修理方法: passo 4, imagem 3 %32
    • リッパーを使って、修理が必要なバッフルの終わりの縫い目をほどきます。ここでは一番近い縫い目は袖下です。

    • 作業しやすいように縫い目は長めにほどきます。

  5. パタゴニアのダウン・ジャケットのバッフルの修理方法: passo 5, imagem 1 %32 パタゴニアのダウン・ジャケットのバッフルの修理方法: passo 5, imagem 2 %32 パタゴニアのダウン・ジャケットのバッフルの修理方法: passo 5, imagem 3 %32
    • ジャケットを裏返します。

    • バッフルの幅を測ります。ここでは5センチです。

    • 2つのバッフルを修理するので、幅10センチ強のあて布が必要です。

    • バッフルの縫い目に沿ってバッフルの長さを測ります。ここでは23センチですが、袖の修理なので2倍の長さの46センチのあて布を用意します。

  6. パタゴニアのダウン・ジャケットのバッフルの修理方法: passo 6, imagem 1 %32 パタゴニアのダウン・ジャケットのバッフルの修理方法: passo 6, imagem 2 %32
    • あて布を用意します。修理箇所を確実に覆うよう各方向に3~5センチ余裕を持たせて布を裁断します。

    • ここでは修理箇所がわかりやすいようにジャケットよりやや明るい色の生地を使用しています。

    • 生地の長辺の端を折り返し、まっすぐにします。

  7. パタゴニアのダウン・ジャケットのバッフルの修理方法: passo 7, imagem 1 %32 パタゴニアのダウン・ジャケットのバッフルの修理方法: passo 7, imagem 2 %32 パタゴニアのダウン・ジャケットのバッフルの修理方法: passo 7, imagem 3 %32
    • 折り目にアイロンをかけます。

  8. パタゴニアのダウン・ジャケットのバッフルの修理方法: passo 8, imagem 1 %32 パタゴニアのダウン・ジャケットのバッフルの修理方法: passo 8, imagem 2 %32 パタゴニアのダウン・ジャケットのバッフルの修理方法: passo 8, imagem 3 %32
    • 折り返した縁を修理箇所の一番外側の縫い目沿いに配置します。

    • 折り返した布が穴の開いたバッフルと継ぎ当て布の間にあることを確認します。

    • バッフルの折り返した縁を縫い目に揃えてまち針でとめます。

  9. パタゴニアのダウン・ジャケットのバッフルの修理方法: passo 9, imagem 1 %32 パタゴニアのダウン・ジャケットのバッフルの修理方法: passo 9, imagem 2 %32 パタゴニアのダウン・ジャケットのバッフルの修理方法: passo 9, imagem 3 %32
    • まち針で留めた箇所をミシンで縫います。

    • 新たなステッチが目立たず、また穴からダウンが出るのを防ぐために極細の針を使用します。

    • もとのバッフルの縫い目上を縫います。折り返し部分の最も生地端に近い所を縫います。

    • 袖を修理するときは袖を塞いでしまわないよう、片側だけを縫っていることを確認してください。

    • もとのバッフルの縫い目をゆっくりと丁寧に縫います。必要であれば折り返した生地端を揃え直してください。

  10. パタゴニアのダウン・ジャケットのバッフルの修理方法: passo 10, imagem 1 %32 パタゴニアのダウン・ジャケットのバッフルの修理方法: passo 10, imagem 2 %32 パタゴニアのダウン・ジャケットのバッフルの修理方法: passo 10, imagem 3 %32
    • 縫い目の端を覆っていたバイアステープを一緒に縫ってしまわないよう注意してください。

    • 折り返し部分を注意深く縫います。

    • 滑りやすい生地なのでゆっくり進めましょう。

    • 縫い目の終わりにたどり着いたら糸がほどけないよう返し縫いをします。

  11. パタゴニアのダウン・ジャケットのバッフルの修理方法: passo 11, imagem 1 %32 パタゴニアのダウン・ジャケットのバッフルの修理方法: passo 11, imagem 2 %32 パタゴニアのダウン・ジャケットのバッフルの修理方法: passo 11, imagem 3 %32
    • ここでは合計3箇所の縫い目を縫っています。外側の生地端を縫い終わったので、真ん中の縫い目は飛ばし、反対側の外側の生地端の縫い目上に2つ目の折り返し部分を揃えてまち針でとめます。

    • 2つめの縫い目を縫います。

  12. パタゴニアのダウン・ジャケットのバッフルの修理方法: passo 12, imagem 1 %32 パタゴニアのダウン・ジャケットのバッフルの修理方法: passo 12, imagem 2 %32
    • 縫い進めます。

    • 2つめの画像は縫い終わった時点での見た目です。

  13. パタゴニアのダウン・ジャケットのバッフルの修理方法: passo 13, imagem 1 %32 パタゴニアのダウン・ジャケットのバッフルの修理方法: passo 13, imagem 2 %32 パタゴニアのダウン・ジャケットのバッフルの修理方法: passo 13, imagem 3 %32
    • もとのバッフルのステッチが見えるようにジャケットの裏返しを直します。

    • バイアステープを一緒に縫ってしまわないよう注意してください。

    • 縫い終わった2つの縫い目の中間にある縫い目にミシンの押さえ金を揃えます。

  14. パタゴニアのダウン・ジャケットのバッフルの修理方法: passo 14, imagem 1 %32 パタゴニアのダウン・ジャケットのバッフルの修理方法: passo 14, imagem 2 %32 パタゴニアのダウン・ジャケットのバッフルの修理方法: passo 14, imagem 3 %32
    • もとのバッフルの中央のステッチの上を直接縫います。

    • バイアステープを一緒に縫ってしまわないよう注意してください。

  15. パタゴニアのダウン・ジャケットのバッフルの修理方法: passo 15, imagem 1 %32 パタゴニアのダウン・ジャケットのバッフルの修理方法: passo 15, imagem 2 %32
    • あて布の余分を切り取ります。

  16. パタゴニアのダウン・ジャケットのバッフルの修理方法: passo 16, imagem 1 %32 パタゴニアのダウン・ジャケットのバッフルの修理方法: passo 16, imagem 2 %32 パタゴニアのダウン・ジャケットのバッフルの修理方法: passo 16, imagem 3 %32
    • ここでは、袖の縫い目を揃え直す必要があります。

    • バイアステープを一緒に縫ってしまわないよう注意してください。

    • はじめと終わりに返し縫いをして、袖下の縫い目を縫い閉じます。

  17. パタゴニアのダウン・ジャケットのバッフルの修理方法: passo 17, imagem 1 %32 パタゴニアのダウン・ジャケットのバッフルの修理方法: passo 17, imagem 2 %32
    • 袖の縫い目上にバイアステープを配置します。

    • バイアステープが縫い目の両側を同等に覆うように調整します。

  18. パタゴニアのダウン・ジャケットのバッフルの修理方法: passo 18, imagem 1 %32 パタゴニアのダウン・ジャケットのバッフルの修理方法: passo 18, imagem 2 %32 パタゴニアのダウン・ジャケットのバッフルの修理方法: passo 18, imagem 3 %32
    • バイアステープを縫い合わせます。バイアステープのできるかぎり内側の生地端を縫います。

    • はじめと終わりに返し縫いをします。

  19. パタゴニアのダウン・ジャケットのバッフルの修理方法: passo 19, imagem 1 %32 パタゴニアのダウン・ジャケットのバッフルの修理方法: passo 19, imagem 2 %32
    • 縫い目をチェックします。すべてがきちんと配置されているのを確認し、糸を切ります。

Linha de Chegada

17 outras pessoas executaram este guia.

Um agradecimento especial a esses tradutores:

en jp

100%

Estes tradutores estão nos ajudando a consertar o mundo! Quer contribuir?
Comece a traduzir ›

Brittany McCrigler

Membro desde: 03/05/12

89.014 Reputação

Autoria de 131 guias

Equipe

iFixit Membro de iFixit

Staff

Membros da 135

Autoria de 16.817 guias

13 comentários

This looks so complicated and I don't own a sewing machine.

soconnell - Responder

I could never do this myself. Is there any talented seamster or seamstress out there who has done this before and would like to do my repair for a fee?

Can one buy matching fabric from patagonia?

danilowitz - Responder

Yes, this seems overwhelming. Patagonia, please sell simple, iron-on supplies in your colors. This would be a GENIUS move. I just bought a used Down Sweater for a mere $30 and need to repair 2 holes. My plan is to stitch them tight with a needle & thread in a similar color (it's Viking Blue), but was hoping for a SIMPLE patch solution on here. None exists. Most of us don't have time for replacing baffles, and aren't looking for perfection. Matching colors would be awesome. As would a clear patch that will last through a lifetime of washes, and has Patagonia's seal of approval. I bet you could come out with a line of simple fix-it products. Even if iron-on solutions only last for say, 10 washes or something. Give busy, working moms like me who rely on your outerwear easier solutions so we can continue to buy used and keep up the green circle, so your products continue to see many years of life. :)

Rachel - Responder

"DITTO"

I've been holding onto a brand new vest, worn a few times. It's been years. Feeling guilty for the small burn hole from permitted fire control. Yes, lesson learned. Never wear synthetics to a burn again! All it really needs is a matching stretchy patch I could surgically repair from the inside out. I'd even settle for keeping some on hand to do again once it looses its staying power! A couple of "heatproof synthetic sharp pointed tweezers" is all I would need :).

Firekeeper -

The other option is to send it in to Patagonia's repair center, it will be free as everything at Patagonia is covered by the Iron Clad Guarantee. They will fix it or replace for free, regardless of when it was bought, how bad of a rip it is, etc.

Mary - Responder

Adicione um comentário

Exibir estatísticas:

Últimas 24 horas: 42

Últimos 7 dias: 283

Últimos 30 dias: 1,203

Duração total: 175,324